Have you ever wondered why some robots move fast and precisely, while others always seem to come up with “unexpected moves”? In reality, training a robot is just like teaching an apprentice: if your instructions are clear, the robot learns accurately; if you’re vague, the robot can only follow in a vague way. Today, we’re here to share how you can use the smartest methods on Advantech’s platform to record demonstrations and build high-yield robotic arms!
The First Step to Building a Robot: Recording Demonstrations — Physical or Virtual? #
On Advantech’s platform, there are two approaches to recording demonstrations:
- Physical Recording: Capture every movement with a real robot.
- Virtual Recording (Isaac Sim): Automatically generate large amounts of data in a simulated environment.
Both methods can produce standardized datasets, which are ultimately used together to train your models. Today, we’ll focus on physical recording, letting you guide the robotic arm through demonstrations and directly teach it how to perform tasks!
Before you start, the platform will automatically check if the hardware is ready—camera, Leader Arm, and Follower Arm are all essential. If anything is missing, you can’t proceed, so ensuring everything is in place is the first step to success!
The Right Camera Angle Means Better Robot Learning! #
Is Camera Angle More Important Than Camera Specs? #
Absolutely! You might think that higher resolution is always better, but the real determinant of data quality is “what is captured,” not “how clearly it is captured.” Imagine teaching someone to assemble parts—if you only provide a ceiling view, no matter how high the image quality, the details can’t be seen. Conversely, with the correct angle, even standard resolution is enough to clearly show what’s happening. The same applies to robot learning.
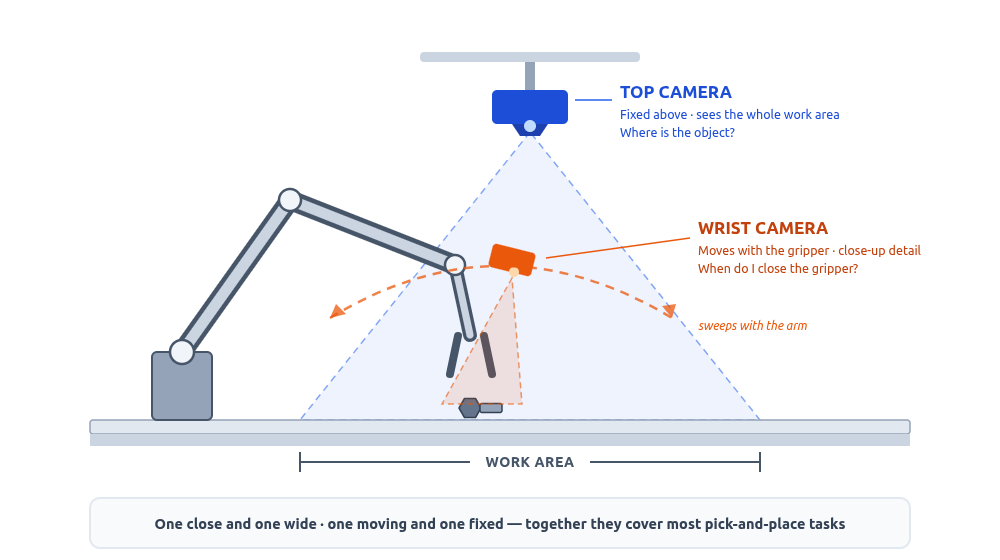
Standard Setup: Wrist + Top-Down — Dual Perspectives for Full Coverage #
| Perspective | Position | Information Provided | What Happens If Missing |
|---|---|---|---|
| Wrist | Near the gripper, moves with the arm | Details of the gripper and object, alignment for grasping, timing for gripper closure | Robot doesn’t know when to close the gripper |
| Top-Down | Above the workspace | Object locations, relative position of arm and target | Robot “blindly” repeats trajectories |
These two perspectives—one dynamic, one static; one close, one distant—cover nearly all the information needed for pick-and-place tasks. This is the recommended starting configuration and the most common solution!
When Should You Add a Third Camera? #
More perspectives aren’t always better—only add extra cameras when the standard setup can’t capture critical information. Common scenarios include:
- The workpiece is blocked by the arm, and the top-down view can’t capture the moment of contact.
- The task requires height or depth judgment (e.g., insertion or stacking).
Pro tip: Stand where the camera is and check the view yourself. If you can’t see it clearly, neither can the robot!
Four Key Principles for Camera Placement #
- The camera must not move! Secure and lock it to prevent accidental bumps.
- Cover the entire task area. The start point, end point, and path should all be within the frame.
- Lighting must be stable. If lighting is hard to control, fix the recording time or add artificial light.
- Record “real-world variations” during the demonstration. If the workpiece position will change after deployment, vary its position during each demonstration.
Don’t Forget to Rename Your Cameras! #
The platform automatically detects cameras by number, so you need to manually rename them to match their actual placement. This makes it much easier to review and verify data. Also, ensure each camera is “enabled”—data from disabled cameras won’t be recorded. This is a common but easy-to-overlook pitfall!
Task Information Settings: Eight Fields That Determine Model Learning Details #
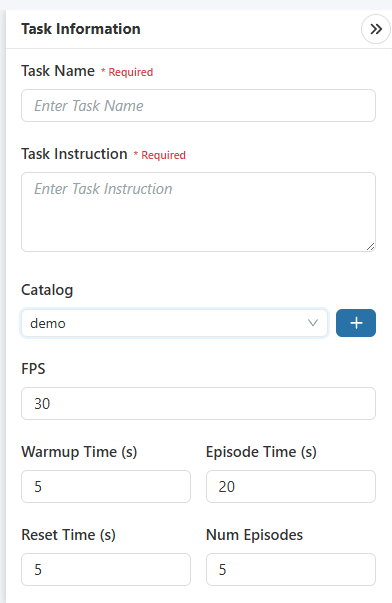
Click the task information button at the top right of the recording page to expand the settings drawer. Each field affects data quality:
- Task Name (Required): Include identifying information, such as
pick_bolt_m6_wrist_top. - Task Instruction (Required): A one-sentence description of the task, e.g., “Pick a screw from the tray and place it onto the fixture.”
- Directory (Dataset): For data management; multiple batches can be stored in the same directory.
- FPS (Default 30): Frames recorded per second; the default suits most scenarios.
- Warm-Up Time (Default 5 sec): Allows the camera stream to stabilize and operators to get ready.
- Round Time (Default 20 sec): Length of a single demonstration; adjust as needed for the task.
- Reset Time (Default 5 sec): Interval between rounds for workspace reset.
- Number of Rounds (Default 5): Number of consecutive demonstrations; adjust based on your strategy.
How to Record a Single Round? Complete Guide to the Operation Cycle #
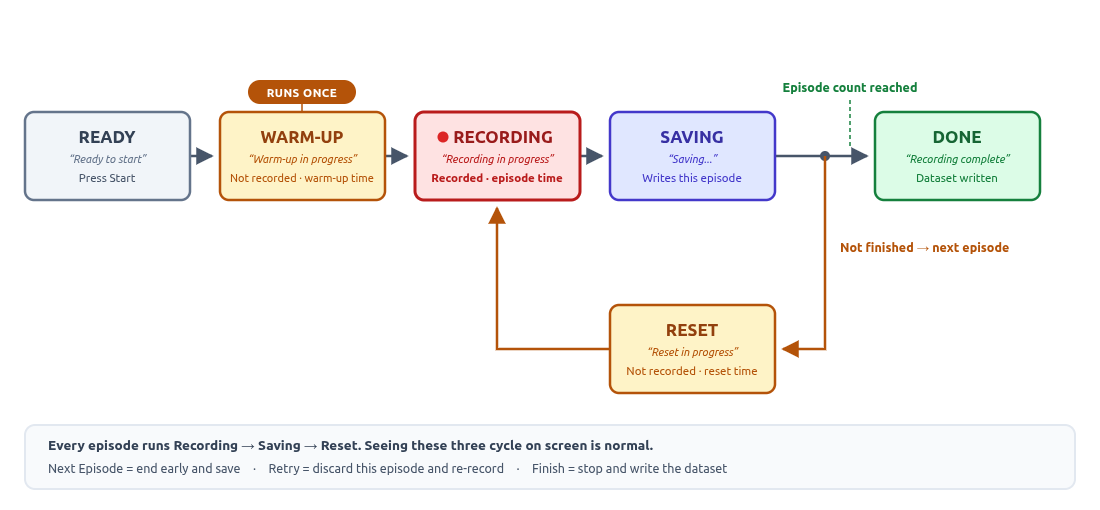
The recording process isn’t as simple as “press start and wait for it to finish”—it’s a cyclical operation:
| Button | Purpose | When to Press |
|---|---|---|
| Start | Initiates the recording process | Once settings are confirmed and your hand is on the Leader Arm |
| Stop | Interrupts the process | In case of unexpected onsite issues |
| Retry | Discards the current round and re-records | When the demonstration goes wrong (most important button!) |
| Next Round | Ends the round early and proceeds | Task is complete, but you don’t want to wait for the timer |
| Finish | Ends recording and saves to the dataset | When you’ve recorded enough rounds |
The screen will display statuses such as “Getting Ready → Warming Up → Recording → Resetting → Saving,” and a prompt appears after each round. Keep an eye on these statuses to ensure every action is recorded!
Tip: Set the round time slightly longer than needed; when the task is done, press “Next Round” to save blank time and boost recording efficiency!
Demonstration Quality Sets Model Performance: Good vs. Bad Demonstrations #
This section has no interface, but it determines the value of your entire dataset!
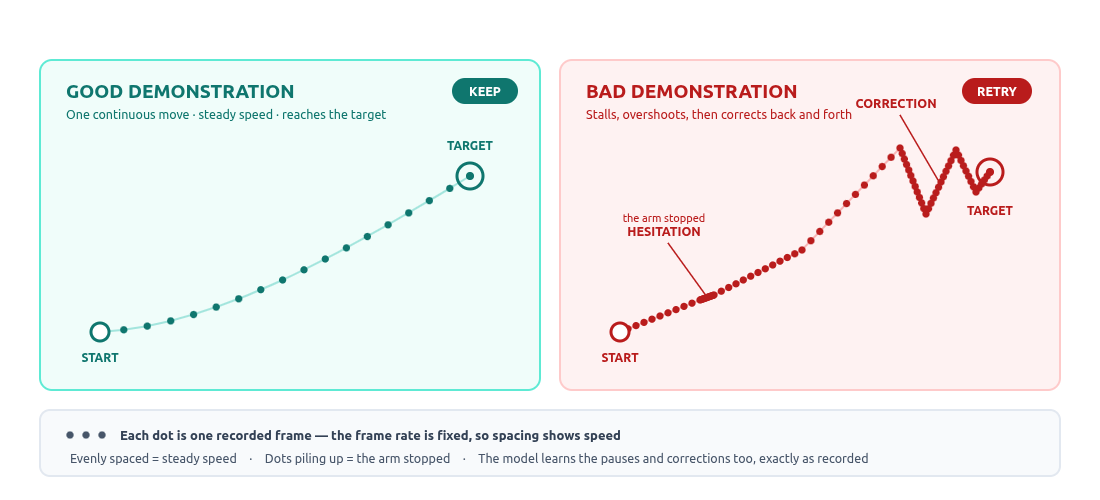
Four Characteristics of a Good Demonstration #
- Fluid Movements: Actions are performed smoothly without pausing to think.
- Consistent Speed: Each round follows a similar rhythm.
- Consistent Path: Overall trajectory is similar, allowing for natural variation.
- Task Completed: The task is completed in full.
Five Scenarios When You Should Press “Retry” #
| Issue | Why You Need to Re-Record |
|---|---|
| Hesitation or Pausing Mid-Task | The model will learn to “pause” in actions |
| Repeated Corrections to Align | The model learns to “make mistakes, then fix” |
| Slips or Knocks Over the Workpiece | The demonstration shows failure, not the intended task |
| Obstructing the Camera Midway | Key visuals are missing |
| Movements Go Out of Frame | The model can’t see where the arm goes and only learns the movement “disappearing” |
The principle is simple: if you wouldn’t use this recording to teach a new colleague, don’t use it for the model.
A bad demonstration is worse than none! Missing a round just means less data; keeping a bad round teaches the model the wrong thing—and you won’t get any errors during training. You’ll only notice weird robot arm behavior during inference, and tracing the root cause is very difficult. Re-recording immediately takes only 20 seconds, but troubleshooting later could mean redoing the whole batch!
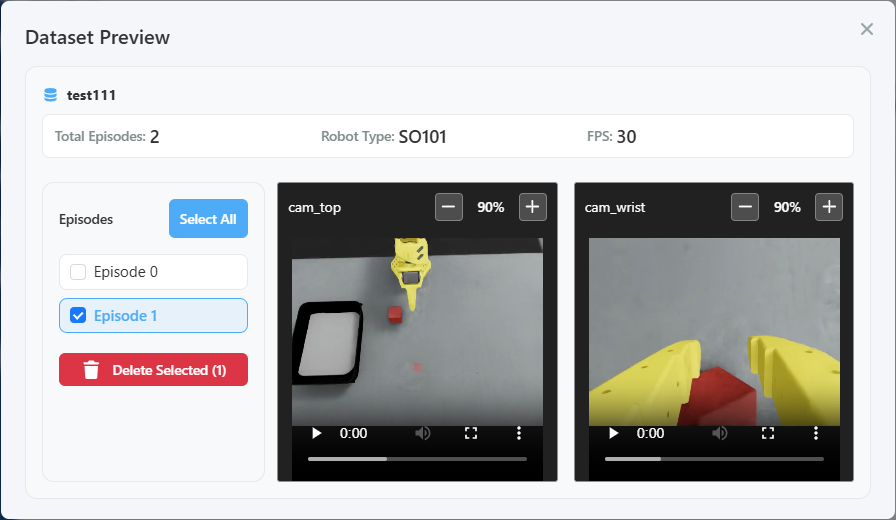
After Recording: Dataset Management and Quality Control #
After you click “Finish,” the platform automatically saves your data in the LeRobot standard format—an open-source community standard. This means your recordings can be directly reused in other toolchains, and physical and simulated data can be combined for training—flexible and convenient!
On the data tools page, do two things:
- Preview: Play back each video round by round to confirm each one is a complete, usable demonstration.
- Delete Individual Rounds: Remove any bad demonstrations as soon as you spot them.
Datasets from multiple recording sessions can also be merged for training, making data management flexible and efficient!
Pre-Recording Checklist: One-Click Success! #
Camera Angles
- Wrist and top-down cameras are connected, showing “connected” status, and enabled
- Camera names match actual placement
- Cameras are securely fixed and won’t be bumped during recording
- Task start point, path, and end point are all within frame
- Lighting is stable and will not change significantly
Task Settings
- Task name is identifiable and instructions are specific and clear
- Round time is sufficient to complete the task with no excess blank time
- Reset time is enough for workspace recovery
Onsite
- Workpieces and fixtures are in place, with enough spares for the full batch
- No obstacles within the robot arm’s working area
- Considered whether workpiece positions will change, and varied them during demonstration
Advantech Continues to Innovate, Making Automation Simpler! #
Demonstration recording is the only part of the process that must be done by hand—and it’s also the most underestimated step. Advantech’s platform automates recording, storage, and format conversion, but “whether the demonstration is good” is up to your judgment in the moment!
The camera determines what the model can see; demonstration quality determines what the model can learn. If you set the wrong angle, the model lacks key information; if the demonstration is poor, the model learns the wrong thing. These issues never appear during training—they’ll only show up as “strange arm movements” during inference.
Most important advice: Press “Retry” a few more times during recording—it’s far easier than troubleshooting later! Each demonstration takes just 20 seconds, but a batch of bad data could waste hours of training and still leave you puzzled.
Advantech is committed to ongoing R&D and active innovation, providing customers with the simplest and most efficient automation solutions. You decide what the robot will learn; we make it easier for you to teach!
In our next article, we’ll explore the efficient new approach of recording in simulated environments—stay tuned for our in-depth analysis!
Physical AI — Making robot teaching easy, making automation possible.