This article has been rewritten and reorganized using artificial intelligence (AI) based on referenced technical documentation. The purpose is to present the content in a clearer and more accessible manner. For technical clarifications or further verification, readers are advised to consult the original documentation or contact relevant technical personnel.
Introduction: Why Has “Secure Boot” Become the New Must-Have in the Embedded Industry? #
Imagine this: your device just powers on, and the very first line of code is about to execute—at this moment, security and trust must step onto the stage. With the rapid rise of IoT, industrial automation, and smart cities, system security is no longer an “optional extra”; it’s now a standard feature for every device. This time, the Advantech R&D team will walk you through the secure boot implementation process on the Rockchip platform, unveiling the mysteries from hardware root of trust to the complete trust chain. Whether you’re in sales, an AE, or a potential customer curious about new technologies, you’ll easily grasp the latest breakthroughs in this field!
Technical Background: Chain of Trust, TrustZone, and Rockchip’s Security Architecture #
What is “Secure Boot”? Simply put, it ensures that from the very first moment the device boots, each step is rigorously verified, guaranteeing that only manufacturer-signed, unmodified code is executed. This is not just a single defense line, but a multi-layered chain of trust:
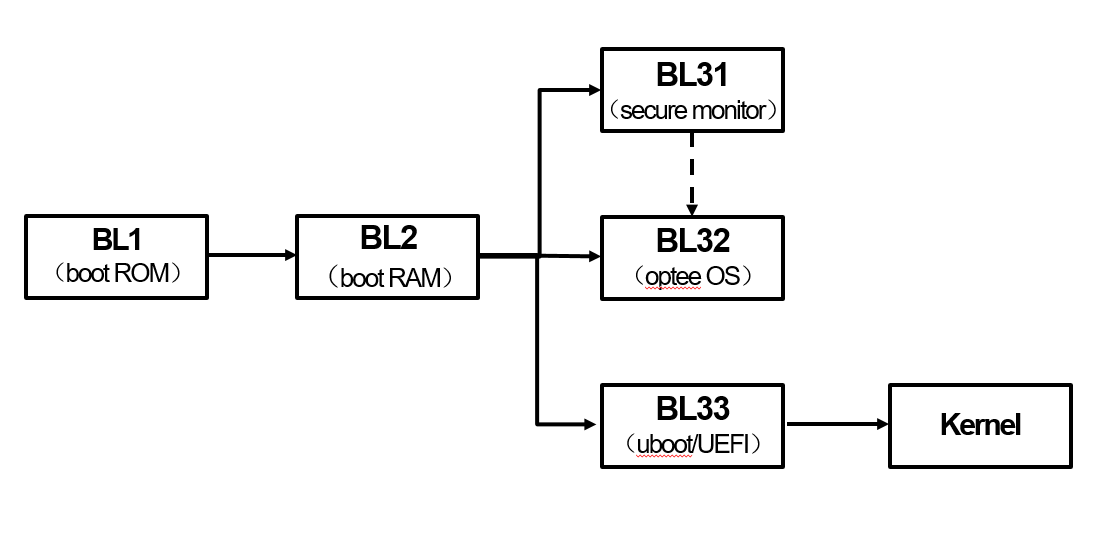
- Hardware Root of Trust: When the device powers on, the built-in MaskROM first verifies the key in OTP/eFuse to ensure the initial bootloader (TPL/SPL) is secure.
- Layered Security Isolation: Leveraging TrustZone technology, the system is divided into Secure World and Normal World domains. Even if general applications are compromised, sensitive data remains protected.
- Clear Privilege Separation: From the highest privilege level EL3 (secure monitor) down to EL0 (user applications), each layer is responsible for verifying the signature of the next, building a complete end-to-end chain of trust.
Want to see a flowchart? Click here
Implementation Process: Five Key Steps to Experience Advantech’s Technical Breakthroughs #
Step 1: Key Generation (One-Time Operation, The Secure Starting Point) #
We offer two methods to generate keys:
- Method 1: Execute Under U-Boot Project
mkdir -p keys
cd keys
./rk_sign_tool cc --chip 3588
./rk_sign_tool kk --out .
cp privateKey.pem ../../dev.key
cp publicKey.pem ../../dev.pubkey
cd ../
openssl req -batch -new -x509 -key keys/dev.key -out keys/dev.crt
- Method 2: Official Command to Generate RSA Key Pair
./build.sh security-createkeys
After execution, three core files will be generated in the u-boot/keys directory:
- dev.key (Private key, for signing, must be backed up offline)
- dev.pubkey (Public key, for verification, embedded in firmware at compile time)
- dev.crt (Self-signed certificate, equivalent to public key, used for image verification)
Note!
- File names must not be changed; otherwise, packaging will fail.
- The public key can be disclosed, but the private key must be securely stored to avoid bricking the device.
- If you encounter the “Can’t load ~/.rnd into RNG” error, make sure to add:
touch ~/.rnd
Step 2: Security Configuration (Enhancing System Protection) #
- Method 1: Modify U-Boot defconfig
Add the following parameters:
CONFIG_FIT_SIGNATURE=y
CONFIG_SPL_FIT_SIGNATURE=y
CONFIG_FIT_ROLLBACK_PROTECT=y          # boot.img rollback protection
CONFIG_SPL_FIT_ROLLBACK_PROTECT=y      # uboot.img rollback protection
- Method 2: Graphical Configuration
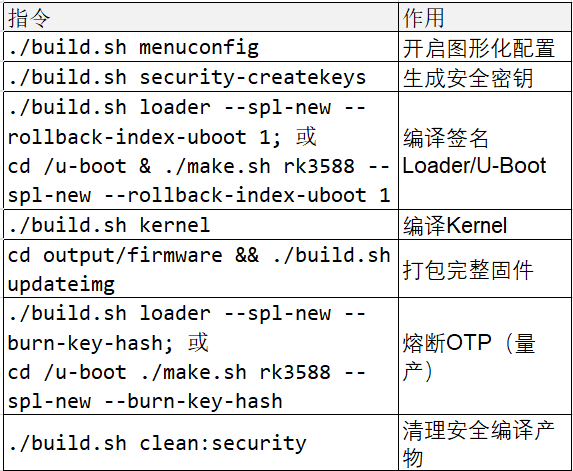
./build.sh menuconfig
Path: Firmware(partition table, misc image, etc.) -> use FIT

Step 3: Firmware Compilation and Signing (Loader, U-Boot, Kernel) #
- Method 1: Compile Commands
./build.sh loader --spl-new --rollback-index-uboot 1
./build.sh kernel
./build.sh modules   # Optional, needed for driver adaptation
This generates signed loader.bin, uboot.img, Image (kernel image), and more.
- Method 2: Batch Compilation Script
./make.sh rv1126 --spl-new --boot_img boot.img --recovery_img recovery.img --rollback-index-uboot 10 --rollback-index-boot 12 --rollback-index-recovery 12
Key Security Modules (enabled in menuconfig):
- CONFIG_BLK_DEV_DM=y (Enable Device-Mapper)
- CONFIG_DM_VERITY=y / CONFIG_DM_CRYPT=y (Support for system verification/encryption)
- CONFIG_TEE=y / CONFIG_OPTEE=y (Enable Trusted Execution Environment)
Sample Signing Output
Image(signed, version=0, rollback-index=10): uboot.img (FIT with uboot, trust) is ready
Image(signed, version=0, rollback-index=12): recovery.img (FIT with kernel, fdt, resource...) is ready
Image(signed): rk3588_spl_loader_v1.18.113.bin (with spl, ddr, usbplug) is ready
Step 4: Firmware Flashing (The Critical Moment for Secure Boot) #
-
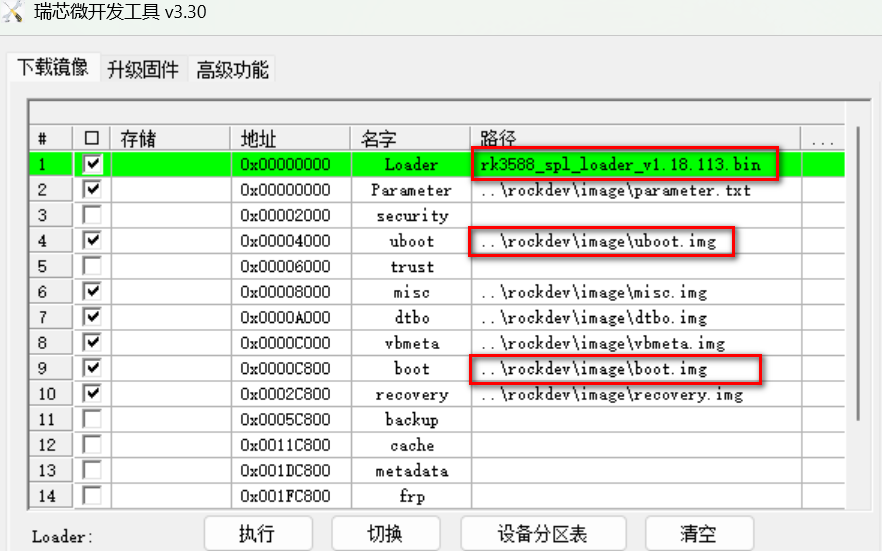
Method 1: Windows Tool RKDevTool
Select the signed files for easy flashing
-
Method 2: Rockchip upgrade_tool Utility
upgrade_tool uf output/firmware/update.img
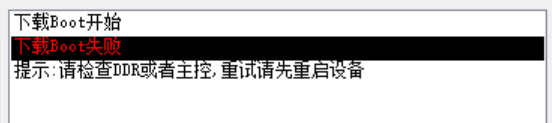
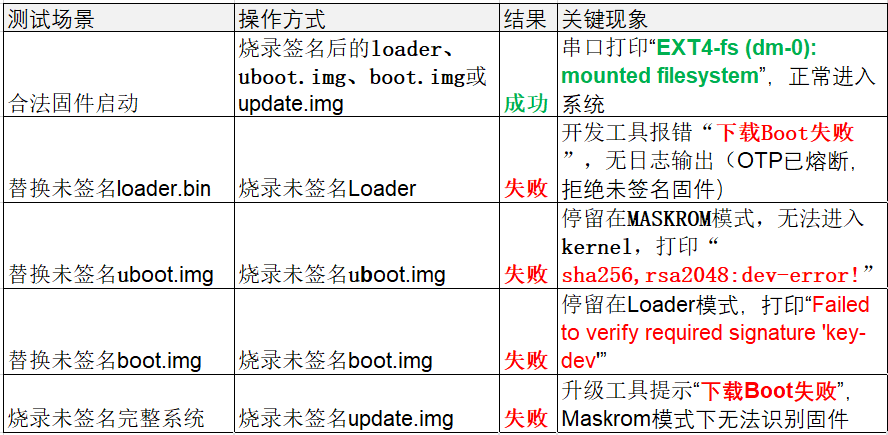
Common Errors and Verification
- Unsigned files will cause flashing failures or prevent the system from booting
- After correct signing, the system will display hash verification and rollback check success messages
- For detailed error screens: Click here
Step 5: Key Burning (The Final Line of Defense Before Mass Production) #
OTP Fusing: During mass production, the key hash must be burned into OTP (irreversible), ensuring device security for life.
- Enable Key Burning Function
./build.sh menuconfig
-> RK_SECURITY -> [*] burn security key
./build.sh loader --spl-new --burn-key-hash
- Successful Fusing Message
The serial port will display “RSA: Write key hash successfully”
Cautions
- Do not burn keys during the debugging phase to avoid bricking the device.
- The private key must be backed up offline; once OTP is fused, loss cannot be recovered.
Results Showcase: Practical Verification and Benefits of Secure Boot #
After the above five steps, Advantech has successfully implemented a secure boot mechanism on the Rockchip platform, ensuring each layer of code is signature-verified, preventing malicious attacks and firmware rollbacks. This not only enhances product security but also meets industry’s high standards for data protection and device reliability.
- Data Isolation: Core keys reside only in the Trusted Execution Environment (TEE) and are inaccessible externally.
- Encrypted Channels: All communications are encrypted via secure proxies, preventing data leakage.
- Replay Attack Prevention: Utilizes dynamic keys and timestamps; tokens are valid only once.

Advantech’s Technical Highlights: Continuous Innovation, Industry Leadership #
Advantech is not just keeping up with the secure boot trend; we are proactively investing in R&D, strictly controlling every detail from key management to firmware signing and OTP fusing. Our team has implemented this process across multiple product lines and will continue to explore:
- Smarter key management solutions
- Automated security verification workflows
- Extension to more embedded platforms and application scenarios

Conclusion & Future Outlook: Guarding the Foundation of Trust for Every Smart Device #
Through Rockchip secure boot implementation, Advantech has not only enhanced product protection but also demonstrated a corporate image of continuous innovation and rigorous R&D. Facing the new trends of IoT, AIoT, and smart manufacturing, we will keep optimizing our security architecture, building more reliable and user-friendly solutions, and work hand-in-hand with customers towards a safer, smarter future!
Notes and Reminders:
- Be sure to back up the private key offline. After OTP fusing, recovery is impossible, so manage it with extreme care!
- Do not burn keys during debugging; only proceed to mass production once firmware stability is confirmed.
- For detailed operational steps, commands, and verification procedures, please refer to the images and examples in this article.
Advantech stays ahead, building the most secure intelligent future for every customer!