DeviceOn Fearless of Disconnection! Advantech High Availability Architecture Test: Helmsman + S2D Keep Your IoT Platform Running Stably!
·loading
Author
Advantech ESS
Table of Contents
Table of Contents
Hi readers! Imagine your IoT platform is the heart of your business operations, responsible for managing devices scattered across various locations, collecting critical data, and executing important commands. If this heart suddenly stops beating, even for just a few minutes, it could cause immeasurable losses. In today’s era highly dependent on data and automation, ensuring the “High Availability” (HA) of your IoT platform is no longer an option, but a necessity!
Advantech deeply understands the importance of platform stability, which is why our engineering team continuously invests in research and development to find solutions that make the DeviceOn platform more robust and resilient to single points of failure. Today, we are excited to share a thrilling experimental result: how to build a simple yet efficient failover architecture for multiple DeviceOn instances using Advantech’s self-developed Helmsman tool combined with Microsoft’s Storage Spaces Direct (S2D) technology!
Why High Availability is Needed? DeviceOn’s Role in It
#
DeviceOn is Advantech’s device management and monitoring platform built for IoT applications. From remote device connection, data acquisition, software updates to security management, DeviceOn acts as a core hub. Imagine if the DeviceOn server responsible for monitoring a factory production line suddenly crashes, production data cannot be transmitted in real-time, device status cannot be tracked, and even remote control fails. This would directly impact production efficiency and operational safety.
Therefore, ensuring that the DeviceOn platform can quickly restore services, or even seamlessly switch to a backup system, in case of hardware failure or software anomaly, is our continuous goal. This is the value of “High Availability” – keeping your critical IoT applications always connected!
To achieve High Availability for DeviceOn, we introduced two key technologies:
Helmsman: This is a “coordinator” tool specially developed by Advantech engineers to solve the DeviceOn HA problem. You can imagine Helmsman as an experienced captain, responsible for coordinating multiple DeviceOn ships (instances), ensuring that when the main ship encounters a problem, a backup ship can be quickly assigned to take over, maintaining uninterrupted navigation (service). Helmsman is currently designed specifically for the Windows environment and is tightly integrated with DeviceOn.
Storage Spaces Direct (S2D): This is a powerful feature of Microsoft Azure Stack HCI and Windows Server. Simply put, S2D can virtualize and pool the internal storage of multiple servers into a shared, fault-tolerant “software-defined storage pool”. All servers connected to this storage pool can access the same data, and data is automatically replicated between different servers. Even if a hard drive in one server fails, the data remains safe and sound. S2D provides a reliable shared data foundation for the DeviceOn HA architecture.
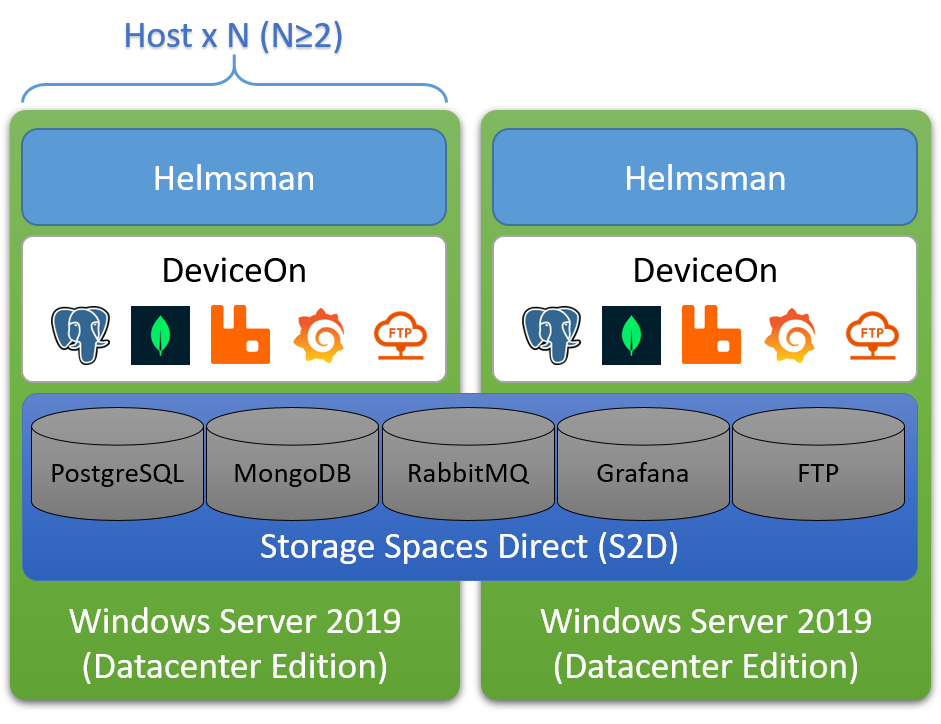
Through Helmsman’s coordination capabilities and S2D’s shared storage advantages, we can allow multiple DeviceOn instances to share the same data, and ensure that at any given time, only one DeviceOn instance is in the “Active” state providing services, while other instances are in the “Standby” state, ready to take over at any time.
Figure: Architecture diagram showing Helmsman coordinating multiple DeviceOn instances with S2D shared storage. At least two DeviceOn instances are required.
Experiment Process Revealed: Step-by-Step Building a DeviceOn HA Environment
#
Our engineers rolled up their sleeves and began this important experiment. The following are the key steps and findings from building this DeviceOn HA architecture:
Environment Preparation:
First, we need a Windows Server environment that meets S2D requirements. In the experiment, we used Windows Server 2019 Datacenter Edition. Several important prerequisites include:
Active Directory Domain Controller: S2D requires all cluster nodes to join the same Active Directory domain.
Separate Management System (Recommended): For convenient remote deployment and management, we prepared a separate Windows Server or Windows 10 computer and installed Remote Server Administration Tools (RSAT) and relevant PowerShell modules.
Server Nodes Meeting S2D Hardware Requirements: At least two servers are needed as DeviceOn nodes. Microsoft recommends using five or more for optimal reliability. To simplify hardware preparation, our experimental environment was built on Azure Cloud, which is also a feasible way to quickly validate an S2D environment. If you choose on-premises deployment, please ensure the hardware meets the S2D requirements.
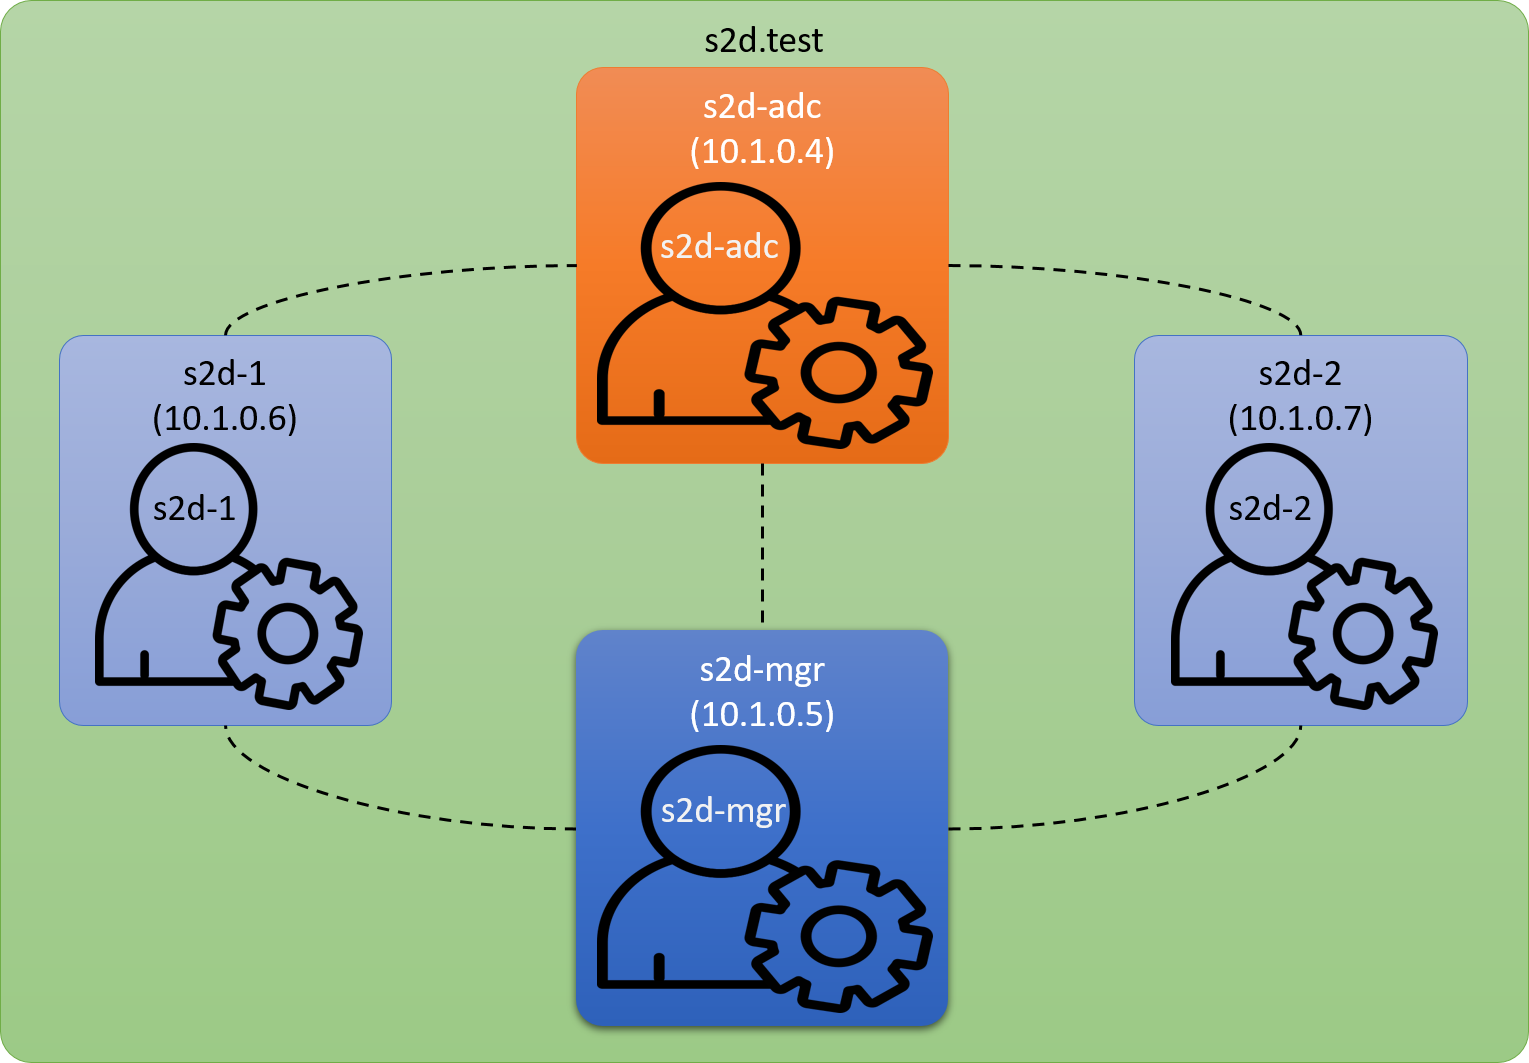
Experimental Environment Topology and Assumptions:
To make the experimental process more concrete, we set up a simple environment topology and related assumptions:
Role
Hostname
Private IP
Administrator Name
AD Domain Controller
s2d-adc
10.1.0.4
s2d-adc
Management System
s2d-mgr
10.1.0.5
s2d-mgr
DeviceOn Node 1
s2d-1
10.1.0.6
s2d-1
DeviceOn Node 2
s2d-2
10.1.0.7
s2d-2
The domain name is set to s2d.test, and the cluster name is S2D-Cluster.
Building Storage Spaces Direct (S2D) Shared Storage
#
This is the foundation of the entire HA architecture. S2D is responsible for pooling the internal storage of multiple nodes into a reliable shared storage space, where DeviceOn’s database and important files will be stored. The following are the detailed steps for building S2D (these steps are mainly executed remotely via PowerShell on the separate management system s2d-mgr):
Step 1: Install Operating System
Install Windows Server Datacenter Edition on each node that will join the cluster (s2d-1 and s2d-2). It is strongly recommended to use Windows Server 2019 Datacenter Edition and run Windows Update to the latest version. If deploying on Azure Cloud, ensure each node has at least two separate data disks attached.
Step 2: Check Connectivity
From the management system (s2d-mgr), check if you can connect to each node remotely via PowerShell.
# Connect to s2d-1Enter-PSSession-ComputerName10.1.0.6-Credentiallocalhost\s2d-1# Connect to s2d-2Enter-PSSession-ComputerName10.1.0.7-Credentiallocalhost\s2d-2
If you encounter WinRM connection issues, you may need to add the node IPs to the TrustedHosts list on the management system:
Step 3: Join Domain and Add Domain Account
Join all nodes to the Active Directory domain (s2d.test), and ensure the domain account used for management (s2d\s2d-adc) has local Administrators privileges on each node.
# Execute from the management system to join nodes to the domainAdd-Computer-DomainName"s2d.test"-Credential"s2d\s2d-adc"-Restart-Force# Add the domain administrator account to the local Administrators group on the nodesNetlocalgroupAdministrators"s2d\s2d-adc"/add
Step 4: Install Roles and Features
Install necessary Windows Server roles and features on all nodes, including Failover Clustering, Hyper-V (if not in Azure environment), File Server, etc.
# Execute from the management system$ServerList="s2d-1","s2d-2"$FeatureList="Failover-Clustering","Data-Center-Bridging","RSAT-Clustering-PowerShell","Hyper-V-PowerShell","FS-FileServer"# Add "Hyper-V" for non-Azure environmentsInvoke-Command($ServerList){Install-WindowsFeature-Name$Using:Featurelist}# Nodes need to be restarted after installation
Step 5: Configure Network
Since the experiment is conducted on Azure Cloud, networking is managed by Azure, and this step can be skipped. For on-premises deployment, please refer to Microsoft documentation for network configuration.
Step 6: Configure Storage Spaces Direct
These steps should be executed with administrator privileges in the local PowerShell on the management system (s2d-mgr).
Step 6-1: Clean Disks
Ensure all non-system disks are empty, without old partitions or data.
# Execute from the management system$ServerList="s2d-1","s2d-2"Invoke-Command($ServerList){Update-StorageProviderCacheGet-StoragePool|?IsPrimordial-eq$false|Set-StoragePool-IsReadOnly:$false-ErrorActionSilentlyContinueGet-StoragePool|?IsPrimordial-eq$false|Get-VirtualDisk|Remove-VirtualDisk-Confirm:$false-ErrorActionSilentlyContinueGet-StoragePool|?IsPrimordial-eq$false|Remove-StoragePool-Confirm:$false-ErrorActionSilentlyContinueGet-PhysicalDisk|Reset-PhysicalDisk-ErrorActionSilentlyContinueGet-Disk|?Number-ne$null|?IsBoot-ne$true|?IsSystem-ne$true|?PartitionStyle-neRAW|%{$_|Set-Disk-isoffline:$false$_|Set-Disk-isreadonly:$false$_|Clear-Disk-RemoveData-RemoveOEM-Confirm:$false$_|Set-Disk-isreadonly:$true$_|Set-Disk-isoffline:$true}Get-Disk|Where Number-Ne$Null|Where IsBoot-Ne$True|Where IsSystem-Ne$True|Where PartitionStyle-EqRAW|Group -NoElement-PropertyFriendlyName}|Sort -PropertyPsComputerName,Count
Step 6-2: Validate Cluster
Run the cluster validation tool to ensure the node configuration is suitable for creating an S2D cluster.
# Execute from the management systemTest-Cluster-Node"s2d-1","s2d-2"-Include"Storage Spaces Direct","Inventory","Network","System Configuration"
As long as the validation report shows “The configuration appears to be suitable for clustering.”, warning messages can usually be ignored.
Step 6-3: Create Cluster
Create the failover cluster.
# Execute from the management systemNew-Cluster-NameS2d-Cluster-Nodes2d-1,s2d-2-NoStorage
Step 6-4: Configure Cluster Witness
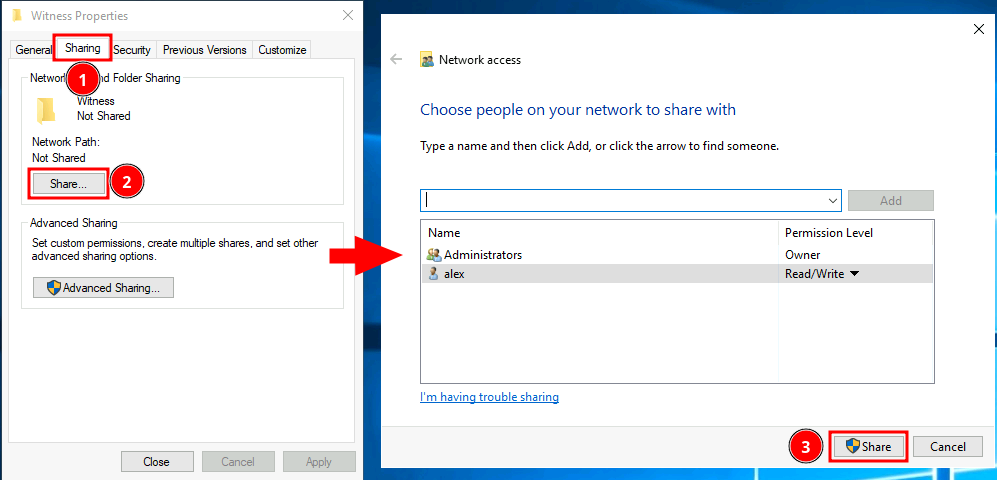
Configure a witness for the cluster to avoid the “Split-Brain” problem. A witness is essential, especially for a two-node cluster. We use a file share as the witness.
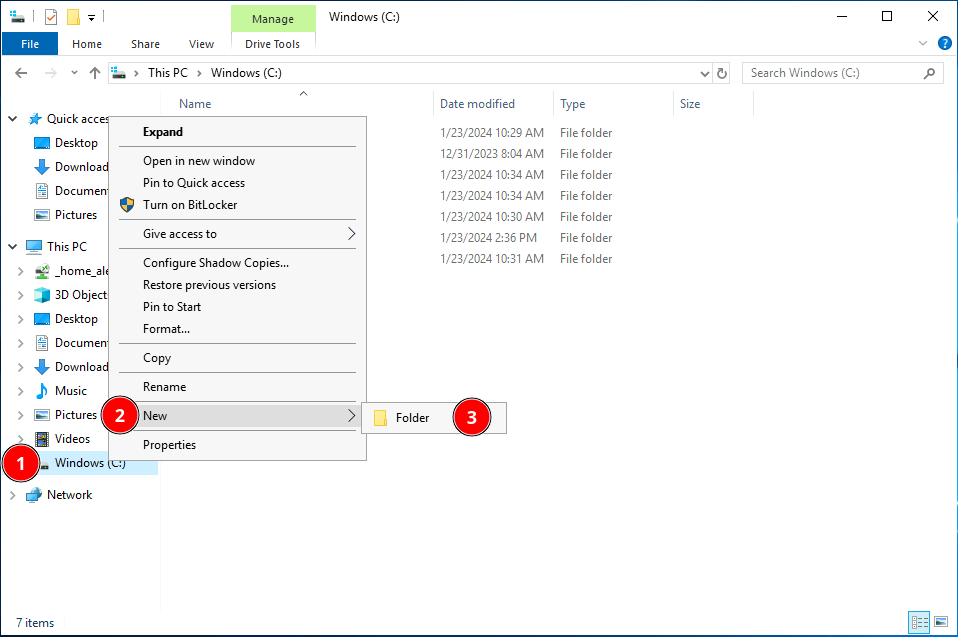
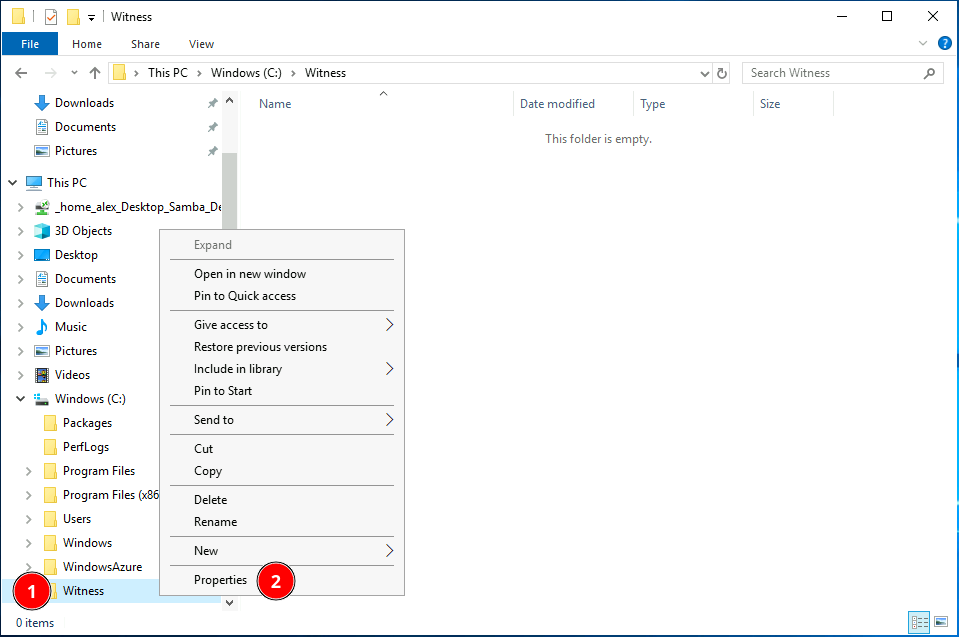
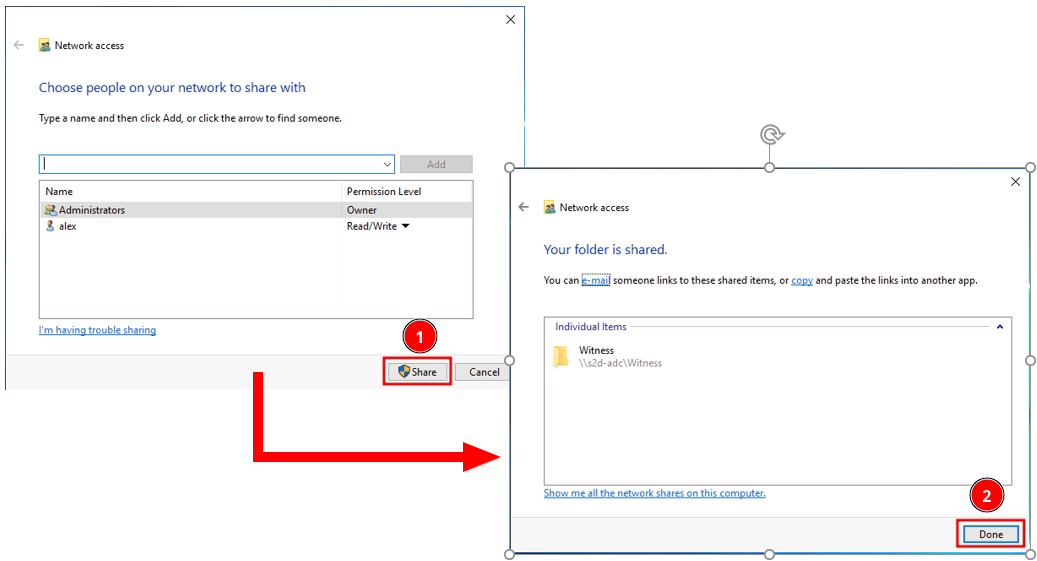
Create a shared folder (e.g., C:\Witness) on the AD domain controller (s2d-adc).
Connect to any node from the management system and configure the file share witness.
# Execute from the management system, connect to any nodeEnter-PSSession-ComputerNames2d-1# or s2d-2# Execute in the node's PowerShellSet-ClusterQuorum-FileShareWitness\\s2d-adc\Witness-Credential(Get-Credential)# End sessionExit-PSSession
Step 6-5: Enable Storage Spaces Direct
Enable the S2D feature. The system will automatically create the storage pool, configure caching, and create storage tiers.
# Execute from the management systemEnable-ClusterStorageSpacesDirect-CimSessionS2D-Cluster
Step 6-6: Create Volume
Create a shared volume on the S2D storage pool to store DeviceOn’s data.
# Execute from the management system, connect to any nodeEnter-PSSession-ComputerNames2d-1# or s2d-2# Execute in the node's PowerShellNew-Volume-FriendlyName"DeviceOn-Data"-FileSystemCSVFS_ReFS-StoragePoolFriendlyNameS2D*-Size10GB# Volume size can be adjusted as needed# End sessionExit-PSSession
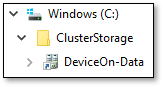
After completion, in File Explorer on each node, you should see the path C:\ClusterStorage\DeviceOn-Data. Files created in this shared folder will be visible on all nodes. This is the magic of S2D shared storage!
Install the DeviceOn server on each node (s2d-1 and s2d-2). Note that the DeviceOn version on all nodes must be exactly the same!
Step 1: Obtain Installer
Obtain the DeviceOn server installer for Windows from Advantech.
Step 2: Run Installer
Run the installer on each node. During installation, it is strongly recommended to use the same values for settings other than the hostname/IP on all nodes.
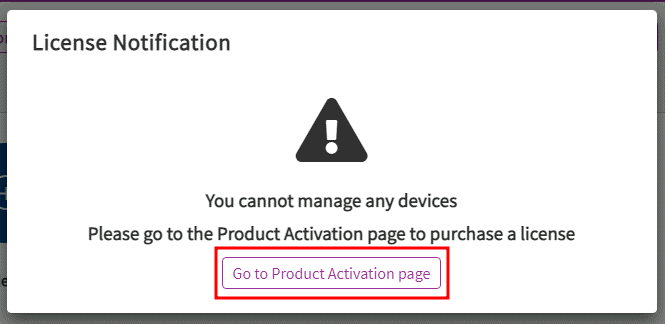
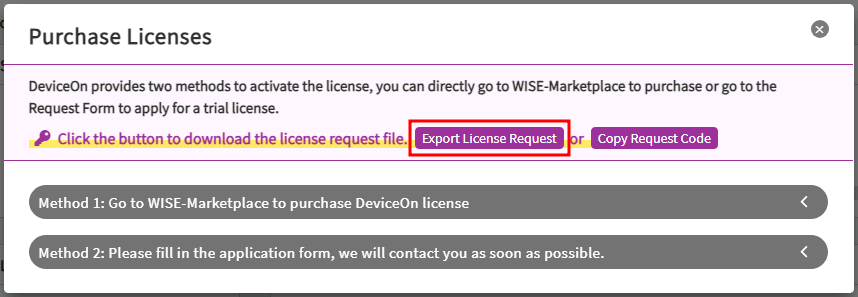
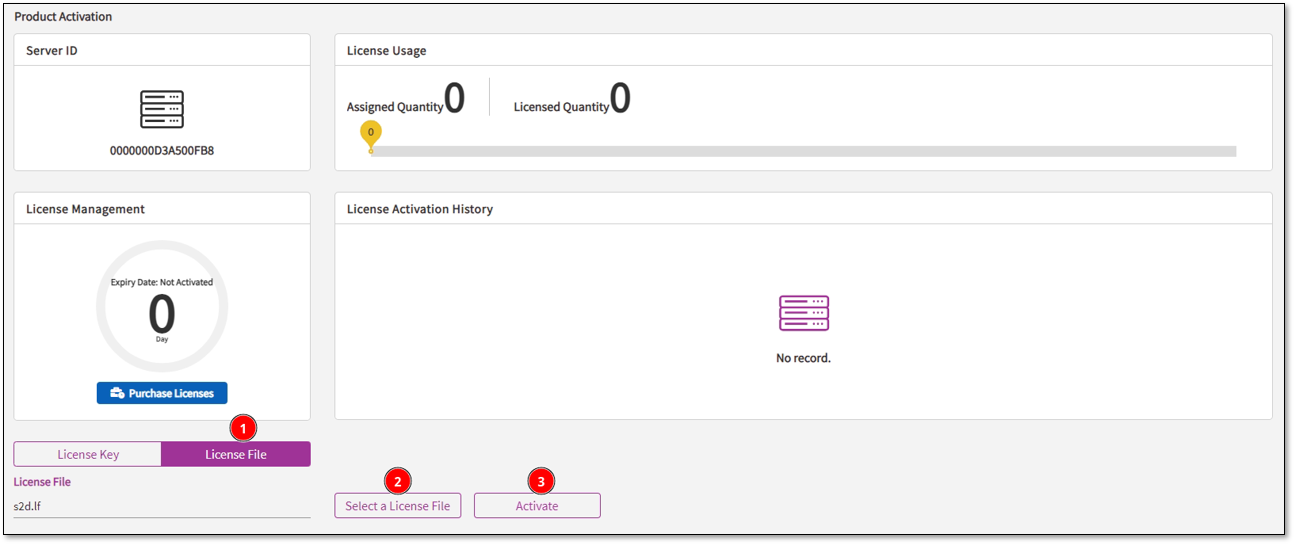
Step 3: Obtain Standalone License Request FileThis step is very important and must be completed before deploying Helmsman! After DeviceOn installation is complete on each node, log in to the DeviceOn Portal (using the root account), go to the Product Activation page, and export the “License Request File”.
Step 4: Obtain HA License File
Collect the standalone license request files from all nodes and contact Advantech to exchange them for an HA environment license file.
Everything is ready, only Helmsman, the “helmsman”, is missing! Helmsman deployment also needs to be executed locally on each node.
Step 1: Obtain Installation Package
Obtain the Helmsman installation package (a zip file) from Advantech, and extract it to a local disk on each node. Find the Helmsman.Deploy.exe executable file.
Step 2: Run Installer
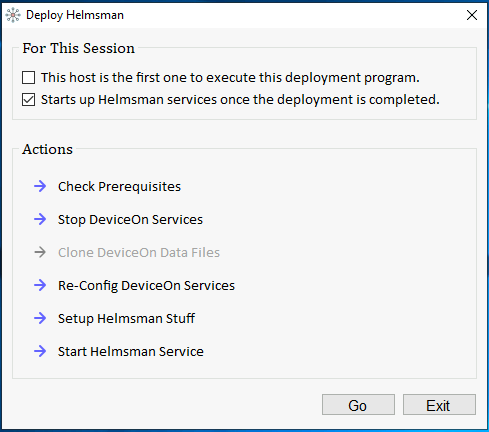
Run Helmsman.Deploy.exe. This is a graphical interface program, intuitive to operate.
The program interface includes two panels: “For This Session” and “Actions”.
For This Session: Contains two options.
☐ This host is the first one to execute this deployment program.: Only needs to be checked on the first node where Helmsman is deployed! Checking this option will copy the local DeviceOn data to the S2D shared storage. Note that this will overwrite any existing DeviceOn data in S2D.
☑ Starts up Helmsman services once the deployment is completed.: Whether to automatically start Helmsman services after deployment is complete, usually keep this checked.
Actions: Displays the list of tasks that will be executed during the deployment process.
Based on whether you are deploying on the first node or subsequent nodes, select the correct options and click the “Go” button to start the deployment.
Step 3: Verify Deployment Results
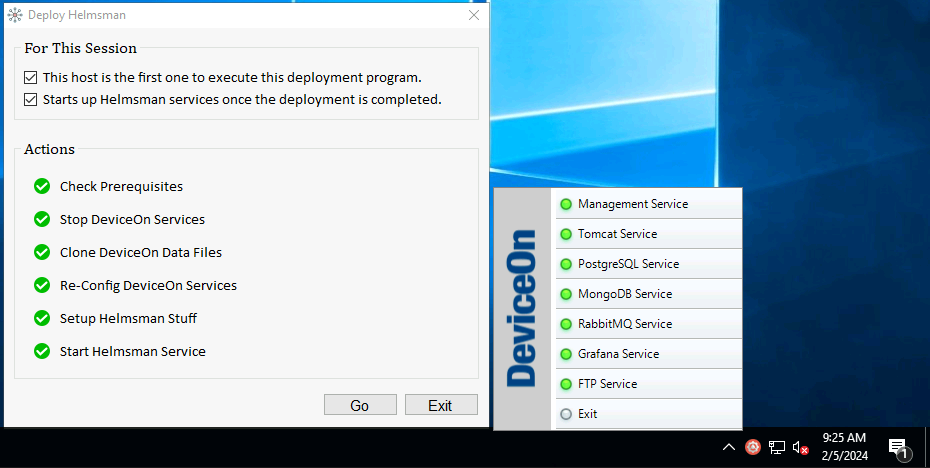
After deployment is complete, check the status of each node. Taking our experiment as an example, first deploy on s2d-1 (check “This host is the first one…”), then deploy on s2d-2 (do not check “This host is the first one…”).
s2d-1 (First Deployment Node):
All tasks should complete successfully. Check DeviceOn Server Control, all services should be green, indicating that s2d-1 is the current Active node.
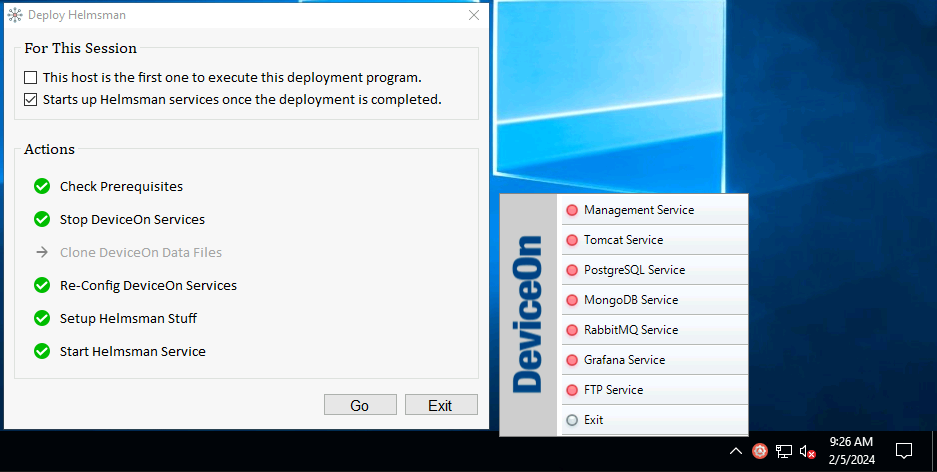
s2d-2 (Subsequent Deployment Node):
The “Clone DeviceOn Data Files” task should be gray (not executed). Check DeviceOn Server Control, all services should be red, indicating that s2d-2 is the current Standby node.
Check Shared Storage: Open File Explorer on any node and navigate to the C:\ClusterStorage\DeviceOn-Data path. You will see that DeviceOn’s database files and Helmsman-related files have been copied here. This proves that the data has been successfully migrated to the shared storage.
Step 4: Import HA License File
Connect to the Portal of the current Active DeviceOn node (e.g., s2d-1) using a browser, and log in with the root account. Go to the Product Activation page and import the HA license file you obtained from Advantech.
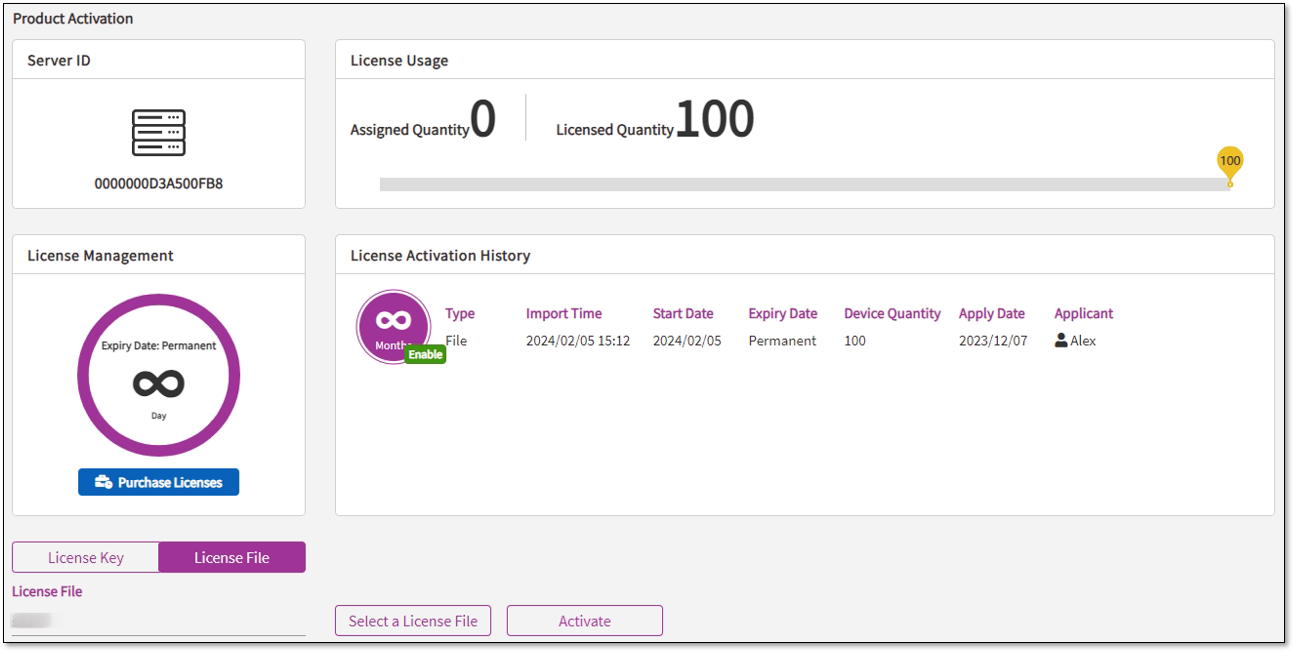
After successful activation, the Product Activation page will show the license usage.
At this point, the setup of the DeviceOn HA environment is complete!
Failover Test: Verifying the Effectiveness of the HA Mechanism
#
Setting up the environment is just the first step; the key is whether it can successfully failover when a fault occurs. We conducted a simple failover test:
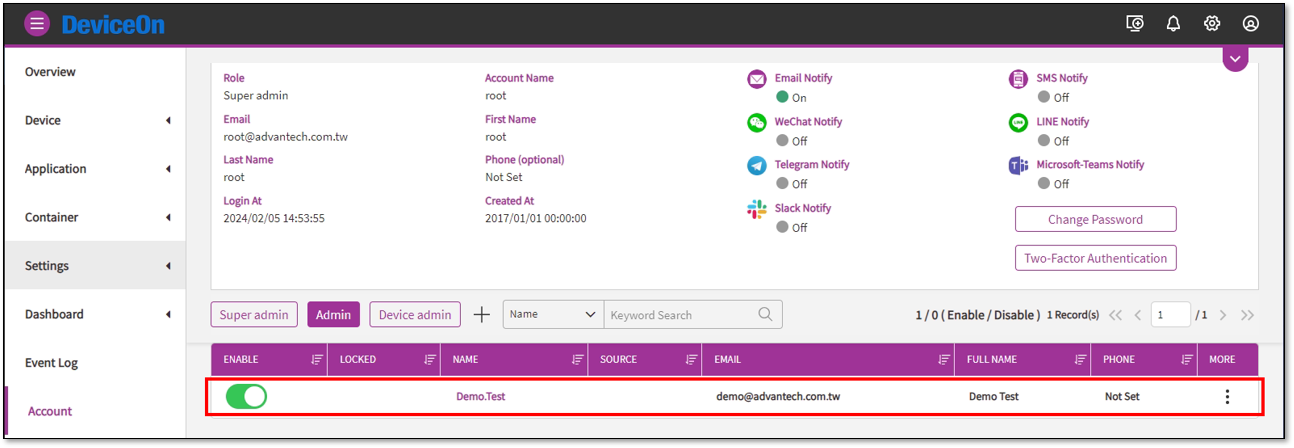
Step 1: Add Data on the Active Node
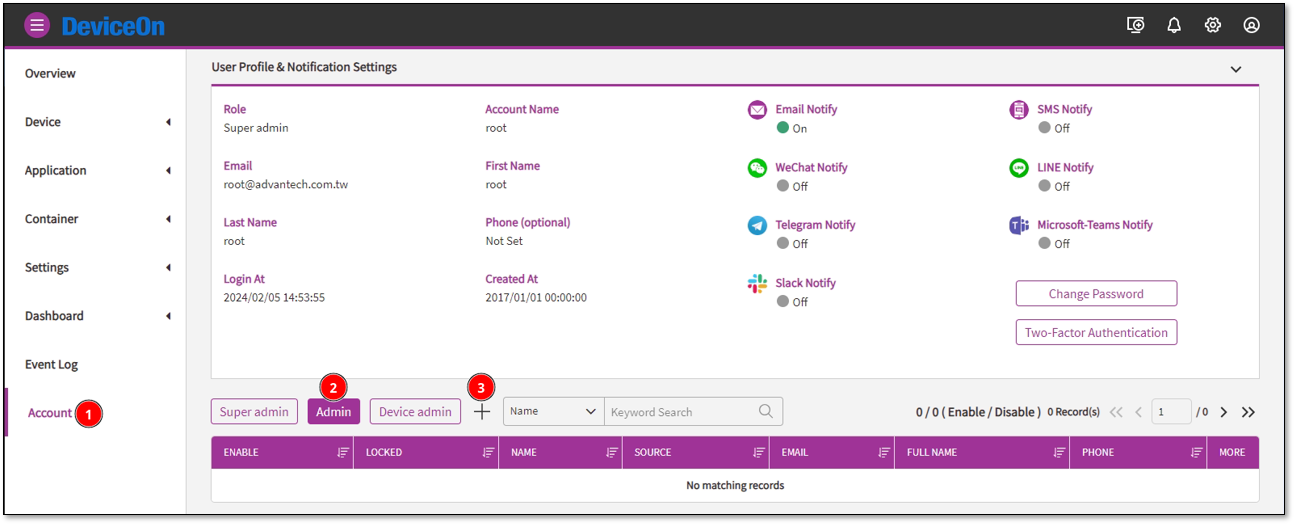
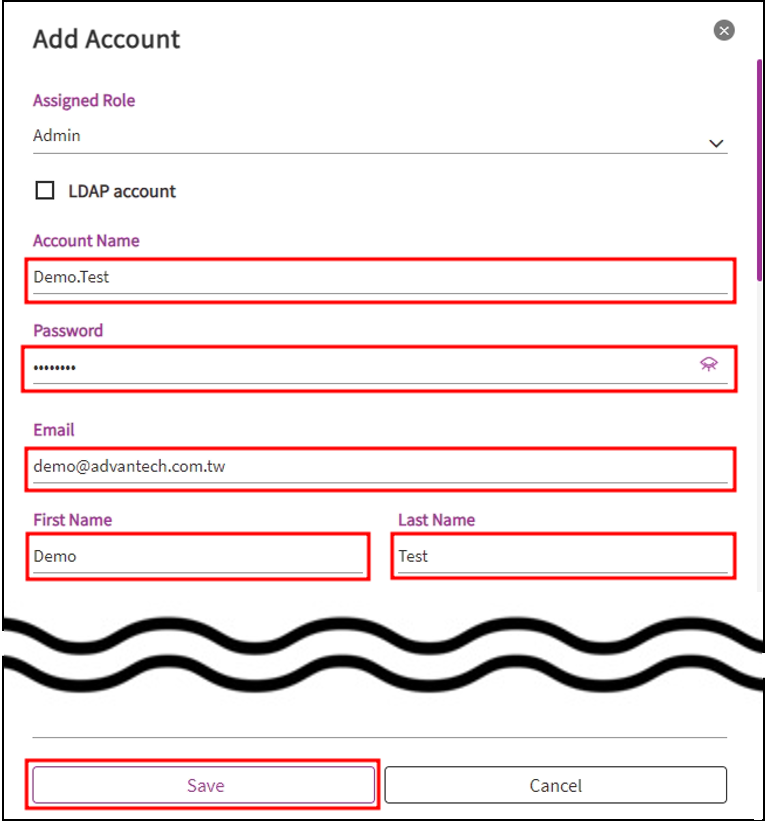
Connect to the current Active DeviceOn Portal (s2d-1), and log in with the root account. On the “Account” page, add a test system administrator account (e.g., Demo.Test).
The information for this new account will be written to the DeviceOn database, which is stored on the S2D shared storage.
Step 2: Simulate Active Node Failure
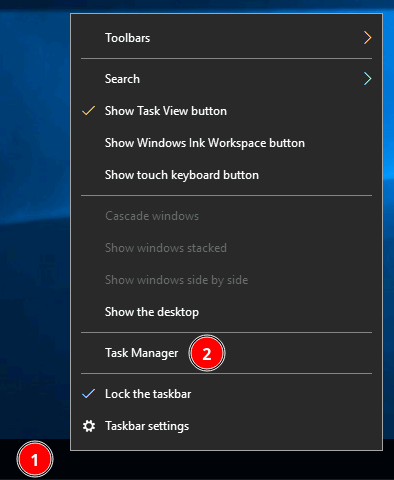
Log in to the Active node (s2d-1) and open Task Manager. Find the main process for DeviceOn Portal, tomcat9.exe, and forcibly end it.
Forcibly ending tomcat9.exe will stop the DeviceOn Portal service, simulating a failure of the Active node.
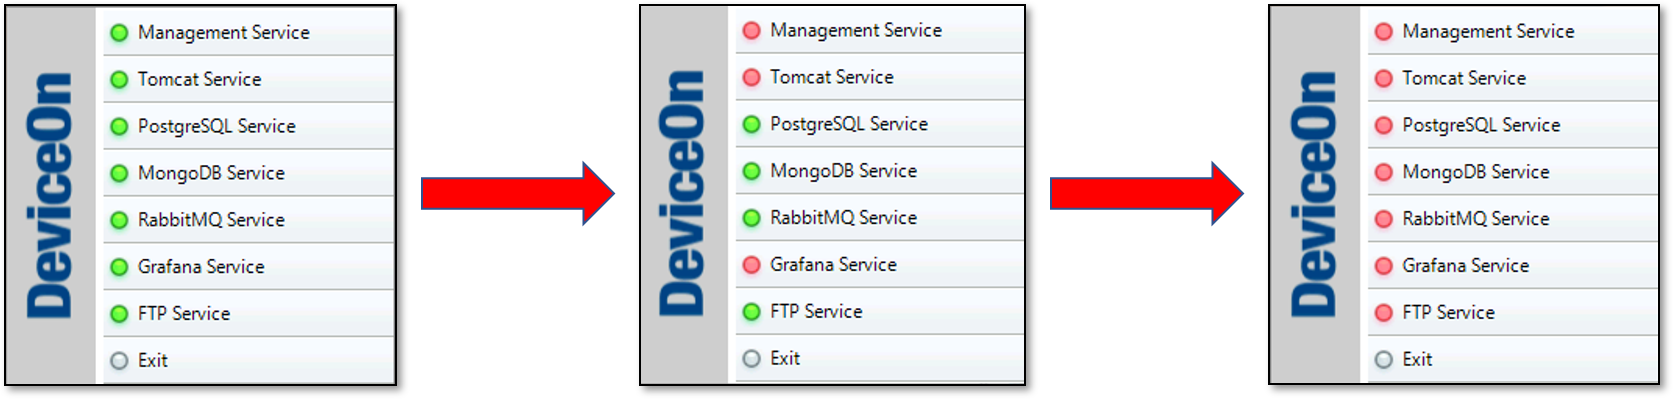
Observe Failover:
Immediately observe the DeviceOn Server Control on s2d-1. The service status will gradually change from green to red.
At the same time, observe the DeviceOn Server Control on s2d-2. You will see the service status gradually change from red to green! This indicates that Helmsman detected the failure of s2d-1 and successfully promoted s2d-2 to be the new Active node.
Step 3: Verify Data on the New Active Node
Now, try connecting to the DeviceOn Portal of the new Active node (s2d-2). Log in with the root account and go to the “Account” page again. You will find that the Demo.Test account you just added on s2d-1 is prominently displayed in the list!
This proves that even if the Active node fails, the standby node can quickly take over, and because the data is stored on the S2D shared storage, all data can be seamlessly accessed on the new Active node, ensuring business continuity.
When the original Active node (s2d-1) recovers, Helmsman will mark its status as “malfunction”. It will remain in this state until the problem is fixed and the __MALFUNCTION__ file in the installation directory is manually removed, after which it will return to the “idle” state, ready to be promoted to Active again in the future.
This experiment successfully validated that a reliable High Availability architecture can be built for the DeviceOn platform using Advantech’s Helmsman tool and Microsoft Storage Spaces Direct technology. This means that our customers can significantly enhance the stability and reliability of the platform when deploying DeviceOn in critical application scenarios, reducing the risk of operational downtime caused by server failures.
This achievement not only demonstrates Advantech’s continuous investment and innovation in improving the stability of the DeviceOn platform but also proves our ability to effectively integrate industry-leading technologies to provide customers with more powerful and reliable IoT solutions.
In the future, Advantech will continue to invest in research and development to further optimize Helmsman’s functionality and explore more technologies to enhance DeviceOn’s High Availability and disaster recovery capabilities to meet the increasingly complex and demanding requirements of industrial IoT applications. Advantech is committed to being your most trusted IoT partner, safeguarding your business with innovative technology!
If you are interested in DeviceOn’s High Availability solution or have any related needs, please feel free to contact Advantech!