Advantech AI Demystified: Build Your Own RAG Q&A System with OpenWebUI, AIR-310 in Action!
·loading
Author
Advantech ESS
Table of Contents
Table of Contents
Have you ever imagined an AI that acts like an experienced expert, not only understanding your questions but also accurately finding answers from a vast database and presenting them clearly to you? Today, let’s embark on this AI adventure together and see how Advantech engineers build and validate a powerful Retrieval Augmented Generation (RAG) system from scratch on our edge AI computing platform, AIR-310!
This is not just a technical experiment; it’s the best proof of Advantech’s continuous exploration and bold innovation in the AI field. Are you ready? Let’s unveil the mystery of the RAG system together!
Why Do We Need RAG? The Secret Weapon of AI Q&A!
#
In the world of AI, Large Language Models (LLMs) are like knowledgeable generalists, eloquent and well-informed. But if we want them to provide precise answers for specific domains (like company product specifications or technical documents), it’s like asking a historian to suddenly become a physics expert – a bit of a tall order.
This is where Retrieval Augmented Generation (RAG) technology comes into play!
Imagine:
Large Language Model (LLM): A highly intelligent assistant with super learning abilities.
Your Own Knowledge Base: One or more “secret manuals” containing internal company knowledge, product specifications, and customer cases.
RAG System: A super librarian. When the assistant receives your question, this librarian first quickly finds the most relevant pages in the “secret manuals” and then hands them over to the smart assistant. The assistant then combines this essential content with its existing knowledge to give you a perfect answer that is both professional and tailored to your needs!
Simply put, RAG allows LLMs to go beyond “general talk” and “deep dive” into your specific data, providing more accurate, timely, and customized answers. This is undoubtedly a great tool for enterprise knowledge management, intelligent customer service, product recommendation, and other application scenarios! The market’s demand for AI solutions that can be quickly implemented and operate efficiently is increasingly urgent, and Advantech is at the forefront of this wave.
AIR-310 in Action: A Behind-the-Scenes Look at Building a RAG System
#
Our engineers chose Advantech’s high-performance edge computing platform, AIR-310, as the stage for this practical demonstration. This hardware, with its powerful Intel CPU and NVIDIA GPU, provides a solid foundation for complex AI computations. Now, let’s follow the engineers’ steps to see how this RAG system was born, step by step!
(Friendly reminder: The following steps retain original technical details. Tech enthusiasts can delve deeper, while non-technical readers can quickly browse to appreciate the ingenuity of Advantech engineers!)
CUDA is a parallel computing platform and programming model developed by NVIDIA, enabling GPUs to handle intensive computing tasks, significantly speeding up AI model training and inference.
Download and install the latest version of CUDA.
Refer to the NVIDIA CUDA Download Page, select the appropriate installation package based on your environment configuration, and then install CUDA:
wget https://developer.download.nvidia.com/compute/cuda/12.9.0/local_installers/cuda_12.9.0_575.51.03_linux.run
sudo sh cuda_12.9.0_575.51.03_linux.run
Note: During NVIDIA CUDA installation on the graphical interface, it is recommended to select the install option (including NVIDIA driver, CUDA Toolkit 12.9, etc.)
After installation, check NVIDIA:
nvidia-smi
(This command displays the GPU status, confirming if the driver and CUDA are working correctly.)
Docker is like lightweight “containers” that can package applications and all their dependencies together, making deployment and management convenient. The NVIDIA Container Toolkit allows these “containers” to also use the powerful computing capabilities of GPUs.
Note: If an error (command 'curl' not found) occurs during installation, please execute the snap install curl command first and then re-run the above commands.
Verify NVIDIA Docker configuration:
docker run --rm --gpus all nvidia/cuda:12.9.0-base-ubuntu22.04 nvidia-smi
(This command attempts to run nvidia-smi inside a Docker container. Success indicates that GPU resources can be used by Docker containers.)
Note: If it prompts that the image cannot be found or the unauthenticated pull rate limit is reached, you need to log in to Docker Hub before proceeding.
Step 2: Create and Configure Docker Network – Enabling Smooth Communication Between AI Components
#
We will create a dedicated internal network for Ollama (LLM service) and OpenWebUI (user interface) to be installed later, ensuring seamless communication between them.
docker network create llm-network
docker network ls
Step 3: Install and Configure Ollama – Summoning Your AI Brain
#
Ollama is a tool that allows you to easily run large language models locally. We will use it to deploy our chosen AI model.
--gpus all: Enable GPU acceleration to make the model run faster!
-v: Mount the model storage directory we just created into the container.
-p: Map port 11434 of the container to the host, allowing us to access the Ollama service.
--name ollama: Give this container a name.
--network llm-network: Add it to the previously created dedicated network.
Check if the container is running normally:
docker ps
Verify if Ollama is running:
curl http://localhost:11434
If you see “Ollama is running”, it means the core service of the AI brain has started successfully!
3.2 Download Models – Loading Knowledge into the AI Brain
#
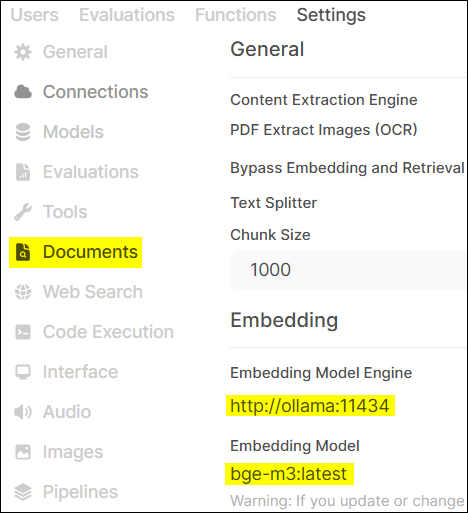
We chose gemma3:4b as the main Chat Model and bge-m3 as the Embedding Model. The function of the embedding model is to convert text into numerical vectors that computers can understand, which is key to achieving “semantic search” in RAG systems.
docker exec -it ollama ollama pull gemma3:4b
docker exec -it ollama ollama pull bge-m3
docker exec -it ollama ollama list  # Verify if models are downloaded successfully, should list gemma3:4b and bge-m3
Step 4: Install and Configure OpenWebUI – Giving AI a User-Friendly Interactive Interface
#
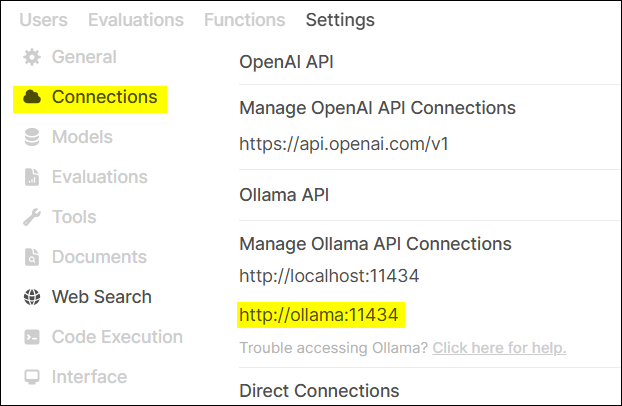
OpenWebUI is an open-source web user interface that allows us to conveniently interact with language models on Ollama and supports RAG functionality.
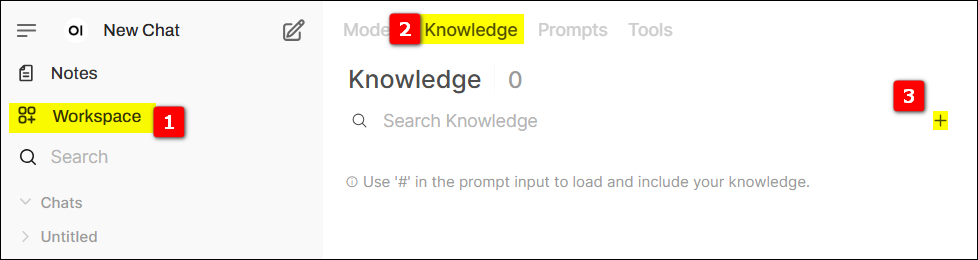
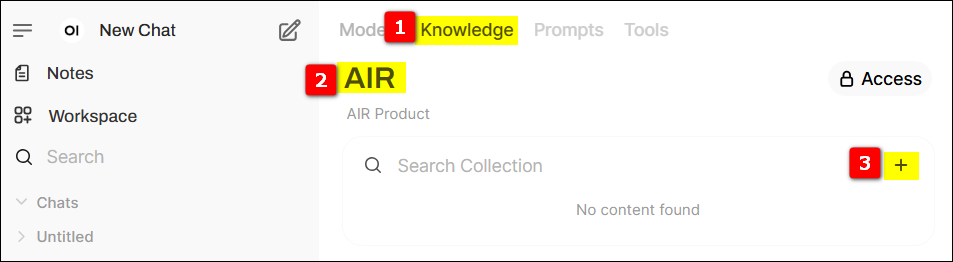
Switch to the knowledge base page, click the + sign on the far right to create a new knowledge base.
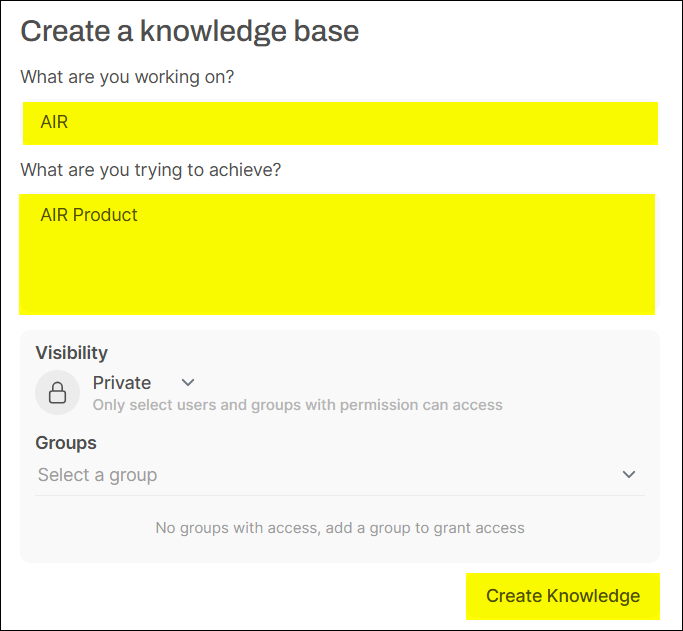
Provide relevant information for the knowledge base and set its access permissions.
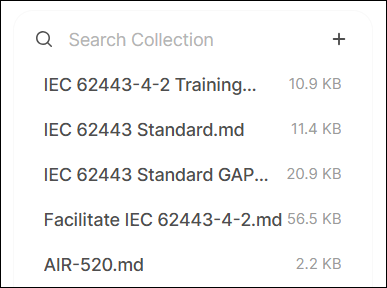
In the newly created knowledge base, click the + on the right to upload relevant data (here we use the Advantech AIR Dataset).
(After uploading, OpenWebUI will use the previously set bge-m3 model to convert the document content into vectors and store them in a vector database for quick retrieval later.)
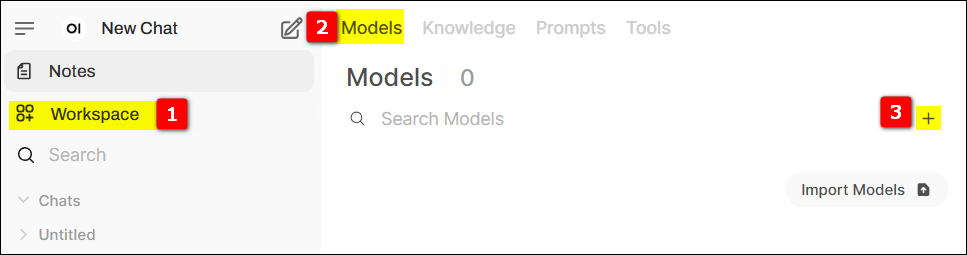
Switch to the models page, click the + sign on the far right to create a new model.
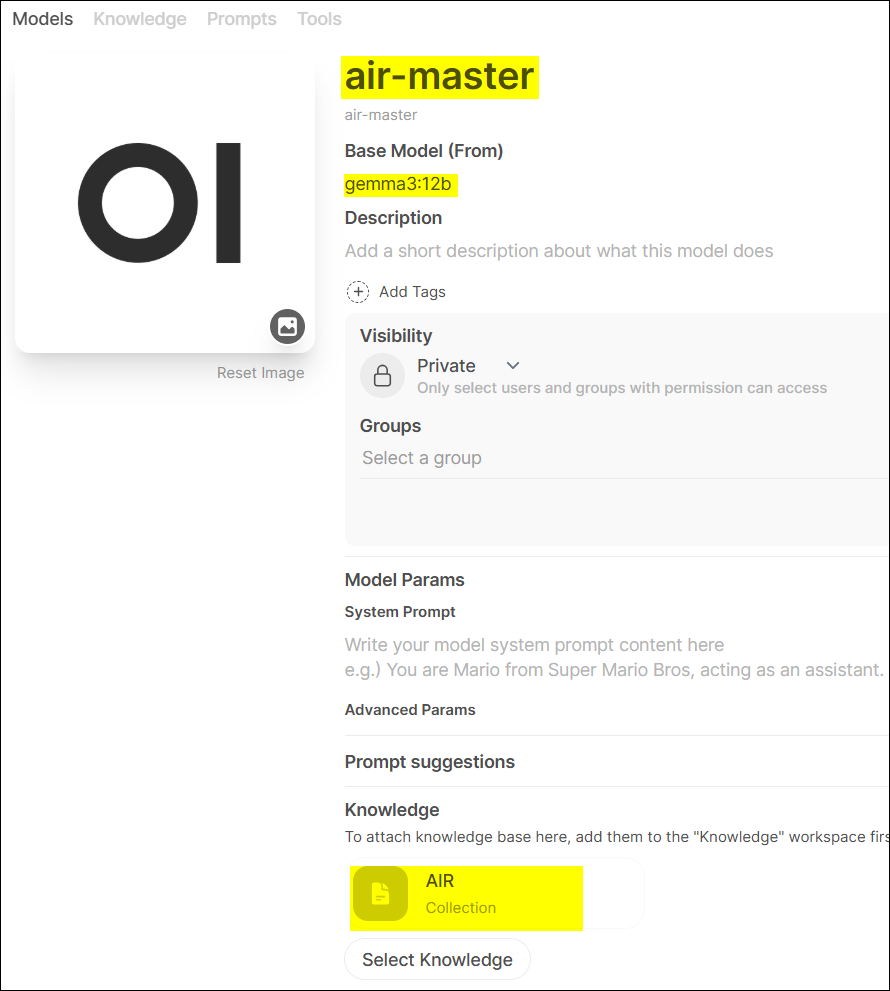
Provide relevant information, such as Model Name (we named it air-master), select the Base Model (Gemma3), and most importantly, select the knowledge base we just created. This way, the air-master model is bound to our AIR product knowledge base!
5.2 Select Model for Q&A Testing – Witness the Magic!
#
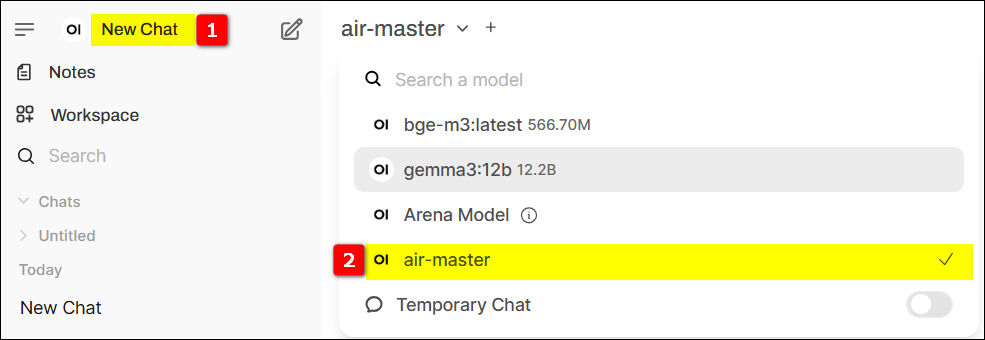
Conduct Q&A testing in New Chat, selecting the model created in the previous step (air-master).
Now, you can start asking questions about Advantech AIR series products! For example: “I’d like to learn more about the Advantech AIR series.” See if the AI can find the answer from the documents you provided.
Step 6: Automated Validation of the Q&A System – Letting AI Take the “Final Exam”
#
To ensure our RAG system is not only smart but also stable and reliable, engineers also prepared a set of automated test scripts.
This configuration file contains test questions and OpenWebUI login information.
[settings]url=http://127.0.0.1:8080/account=root@advantech.com.twpsw=P@ssw0rd[model]model=air-master[poch1]q1=What are the benefits of Advantech's certification service?q2=How does Advantech streamline IEC 62443-4-2 certification? Please list the key offerings.q3=How can Advantech's IEC 62443 certification service help meet the EU Cyber Resilience Act (CRA) requirements?q4=How do TPM 2.0 and BitLocker work together to enhance system security?q5=What is the purpose of Advantech Powersuite for security configuration?[poch2]q1=I'd like to learn more about the Advantech AIR series.q2=Which AIR product supports an MXM GPU card?q3=Which AIR product comes with a built-in Hailo-8 AI accelerator?q4=Which AIR products use an NVIDIA Jetson module, and in addition, which AIR products are NVIDIA Certified?q5=Suggest an AIR solution featuring Advantech software that focuses on LLM fine-tuning tasks.
Explanation:
[settings]-url: Server URL
[settings]-account: Username
[settings]-psw: System login password
[model]-model: Model to be selected for Q&A (this is the air-master we created earlier)
[poch1] & [poch2]: Default two rounds of Q&A, including a series of questions about Advantech products and services.
Right-click or execute ./UIQueAndAns1 to run the script.
The script will automatically open Firefox, log in to OpenWebUI, select the air-master model, and then ask the questions set in config.ini one by one, recording the AI’s answers. This is like a rigorous exam, testing whether the AI can accurately understand the questions and find the correct answers from the knowledge base.
Impressive Results: Advantech’s AI Capabilities Upgraded!
#
Through this practical exercise, we successfully built a fully functional RAG Q&A system on the Advantech AIR-310 platform using OpenWebUI and Ollama. This system can:
Integrate Specific Knowledge: Effectively transform Advantech AIR series product documents into an AI-usable knowledge base.
Provide Precise Answers: For specific questions, retrieve relevant information from the knowledge base to generate answers that are more accurate and specific than general LLMs.
Easy to Operate and Validate: Simplify system operation and validation processes through OpenWebUI’s user-friendly interface and automated test scripts.
This technological breakthrough means that for Advantech itself, we have the ability to create smarter internal knowledge management tools, improving employees’ efficiency in obtaining information. For our customers and partners, it demonstrates the powerful potential of Advantech’s hardware platform in AI applications. Imagine, in the future, your equipment manuals, technical support documents, and even customer FAQs can be transformed into a 24/7 intelligent expert through such a RAG system!
Compared to traditional keyword searches, RAG systems can better understand the semantics of questions. Even if the questioning method differs, as long as the core meaning is consistent, the AI can find relevant answers. This is undoubtedly a major step forward in the field of information retrieval.
Conclusion and Future Outlook: AI Innovation, Advantech Never Stops!
#
Successfully building and validating the RAG system on AIR-310 this time is not only a brilliant demonstration of the technical strength of Advantech’s engineering team but also highlights our determination to continuously invest in R&D and actively embrace innovation in the AI field.
We are well aware that AI development is changing rapidly, and today’s breakthrough is just a starting point for infinite possibilities in the future. In the future, Advantech will continue to explore:
More Advanced Models: Introducing more powerful and efficient language models and embedding models.
More Complex Knowledge Bases: Handling more diverse and structured enterprise data.
Broader Application Scenarios: Expanding RAG technology to more vertical domains such as Industrial IoT, smart healthcare, and smart cities to create tangible value for customers.
More Optimized Edge Deployment: Continuously optimizing the performance of AI models on Advantech’s edge computing platforms to achieve lower latency and higher efficiency edge intelligence.
Advantech believes that the power of AI lies in its application and in solving real-world problems. We are happy to share our research results and look forward to collaborating with more partners to jointly explore the frontiers of AI technology and create a bright future of intelligence. If you are interested in our AI solutions or have any innovative ideas, please feel free to contact us! Let’s ignite the spark of wisdom with AI together!