This article has been rewritten and reorganized using artificial intelligence (AI) based on referenced technical documentation. The purpose is to present the content in a clearer and more accessible manner. For technical clarifications or further verification, readers are advised to consult the original documentation or contact relevant technical personnel.
Have you ever developed a cutting-edge Python application, especially in the AI vision field, only to encounter significant difficulties when deploying it to different environments? Or perhaps you’re a sales representative or Account Executive (AE) hoping to showcase our latest AI technology to clients, but the tedious environment setup always gives you a headache?
Don’t worry! Today, let us, the professional editors at Advantech, guide you through the latest experimental results from our engineering team: how to perfectly package a Python AI application that needs to “see” the external world (using an OpenVINO™ demo as an example) into a lightweight and portable Docker container! This is not just a small technical breakthrough, but also the best proof of our continuous innovation and commitment to solving customer pain points.
Why Docker? The New Trend in AI Application Deployment #
Imagine Docker as a magical “shipping container.” You can pack your application and all its necessary tools, libraries, and configuration files inside. No matter which machine you want to “ship” this container to (development, testing, client-side), everything inside will work perfectly, eliminating the “But it runs on my machine!” dilemma.
For AI applications, especially those using powerful tools like Intel® OpenVINO™ for model inference, environment setup is often more complex. After Dockerization, not only does deployment become simple and fast, but it also ensures consistency in the execution environment. This is a huge boon for Industrial IoT (IIoT) or edge computing scenarios that require stability!
Market Demand: As AIoT applications become more widespread, customers increasingly need solutions that are quick to deploy, easy to manage, and stable in operation. Dockerizing AI applications is a crucial step in meeting this demand.
The Experimental Challenge: When Docker Meets the “External Camera” #
The star of this experiment is an object detection application using Python and OpenVINO™. Sounds standard? But the key is: it needs to connect to the computer’s “external camera” to capture images in real-time!
Generally, a Docker container is a relatively isolated environment. Allowing it to access the host computer’s hardware devices (like a camera) requires some special techniques. This is precisely the challenge our engineers aimed to overcome in this experiment, and it’s where Advantech’s technical prowess shines!
Unboxing the Experiment: Following the Engineers’ Steps #
Our engineers, upholding a spirit of pragmatism, explored step-by-step how to enable the Docker container to successfully “see” the camera. Here is the record of their exciting experimental process (don’t worry, we’ll explain it in the simplest terms!):
Prerequisites:
- Ensure Docker is installed: It’s like needing a truck before you can move house! Open a terminal and type
docker --versionto check.docker --version

- A camera: Our AI needs “eyes” to see the world.
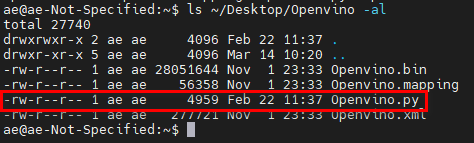
- Prepare your Python application: Ensure your Python code (like
Openvino.pyin the image below) and related model files are ready, and can run successfully independently on your computer.

Steps:
- Step 1: Write the Dockerfile (Design the Blueprint)
- In the root directory of your Python application, create a plain text file named
Dockerfile(no extension). - Inside the
Dockerfile, we tell Docker how to “build” this container.FROM ubuntu:22.04: Specify the base environment, like laying the foundation for a house. Here, we choose the Ubuntu 22.04 operating system.WORKDIR /usr/src/app: Set the working directory inside the container. Subsequent operations will take place here.COPY . ./: Copy all files from the current host directory (your Python script, model files, etc.) into the container’s working directory.CMD ["python3", "Openvino.py"]: Set the command to execute when the container starts, which is running our Python program.
- In the root directory of your Python application, create a plain text file named

- Step 2: Build the Docker Image (Construct According to the Blueprint)
- In the terminal, navigate to the directory containing the
Dockerfile. - Execute the
docker build -t your_image_name:tag .command to build the image.your_image_nameis the name you give this image (e.g.,ty_sop).tagis the version tag (e.g.,1.0.0)..indicates using theDockerfilein the current directory.
- In the terminal, navigate to the directory containing the
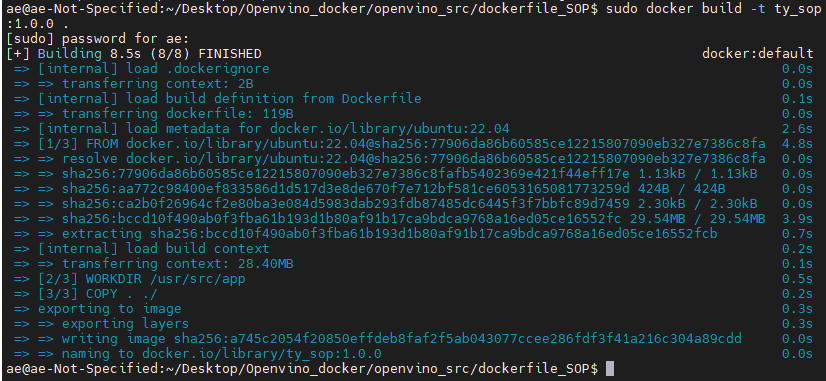
ty_sop was created successfully.

- Step 3: Install Necessary “Tools” (The Main Event: Enabling Camera Access and Installing Dependencies)
- Here comes the crucial part! Since our program requires libraries like OpenVINO™ and OpenCV, and also needs to access the external camera (
/dev/video0) and display the feed, we can’t just run the image from the previous step directly. We need to first “enter” this intermediate container, install all the required tools, and specifically set up the bridge to communicate with external hardware.
- Execute the following command to start an interactive container with special configurations:
docker run -it --name tycontainer --device=/dev/video0:/dev/video0 --network host -e DISPLAY=:0.0 ty_sop:1.0.0 /bin/bash-it: Allows us to interact with the container (like opening a terminal).--name tycontainer: Assign a name to this temporarily running container.--device=/dev/video0:/dev/video0: Core step! This command mounts the host’s camera device (/dev/video0) into the container, allowing programs inside the container to access it.--network host: Lets the container use the host’s network, simplifying some configurations.-e DISPLAY=:0.0: Allows the container to display graphical interfaces (our camera feed) on the host’s screen.ty_sop:1.0.0: The image we just built./bin/bash: The command to execute after entering the container (opens a shell).
- Here comes the crucial part! Since our program requires libraries like OpenVINO™ and OpenCV, and also needs to access the external camera (

Bash apt update apt install python3 apt install python3-pip pip install openvino apt install python3-opencv apt install xserver-xorg # Graphics interface related apt install xinit # Graphics interface related apt install x11-xserver-utils # Graphics interface related
* These commands install Python 3, the pip package manager, the OpenVINO™ library, the OpenCV library, and the necessary X Server components for displaying graphics within the container.
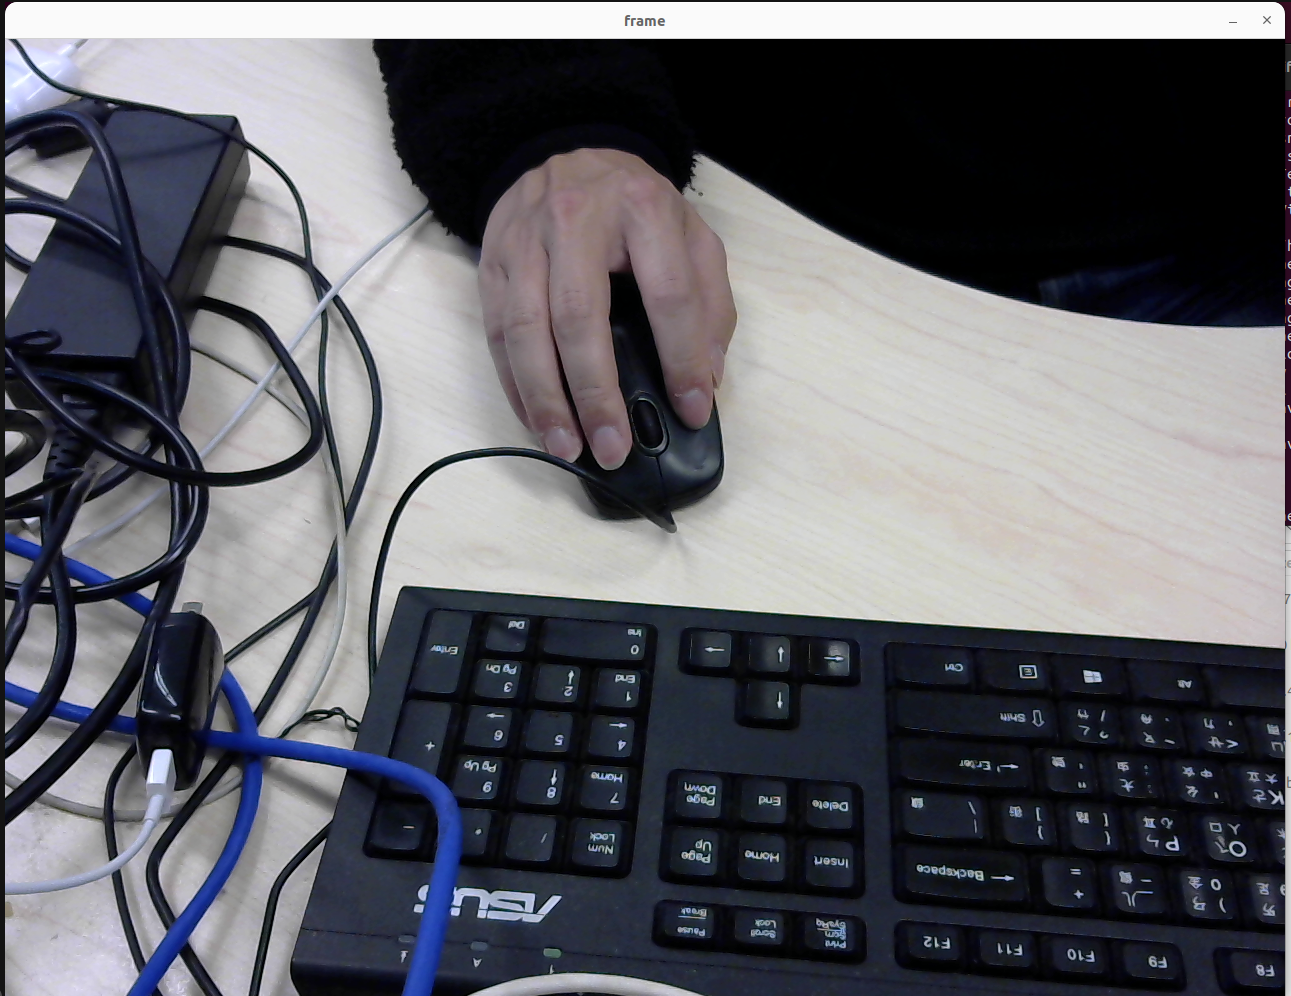
3. Try running python3 Openvino.py inside the container. If everything is set up correctly, you should see the camera feed display successfully! This means we’ve successfully enabled the container to access the camera and perform AI inference!
4. Important step: Save the results! Open another host terminal (not the one inside the container) and execute the following command to “freeze” the state of the container (with all tools installed and configured) into a new Docker image.
Bash docker commit tycontainer ty_sop_packages:1.0.0
* tycontainer: The name of the container we were just running.
* ty_sop_packages:1.0.0: The name and tag for the new image. This image now includes all installed dependencies.

Dockerfile (you can create this in a separate empty folder). This time, we’ll use the image we just created with commit (which already contains all dependencies) as the base.
Dockerfile FROM ty_sop_packages:1.0.0 WORKDIR /usr/src/app CMD ["python3", "Openvino.py"]
* Note that the FROM instruction now points to the new image we committed: ty_sop_packages:1.0.0.
* WORKDIR and CMD remain the same, as the code was already copied in the previous steps.

docker build command again to build the final, directly runnable image.
Bash sudo docker build -t ty_runnable .
* This time, we name the final image ty_runnable.
7. Success! Now, you can use the following commands to start this final version of the container. It should directly access the camera and run your Python AI application:
Bash # Execute on the host to allow the container to display graphics export DISPLAY=0.0 xhost + # Start the container docker run --name tycontainer --device=/dev/video0:/dev/video0 --network host -d -e DISPLAY=:0.0 ty_runnable
* xhost +: Allows any user to connect to the X server (for displaying graphics).
* -d: Runs the container in detached mode (in the background).
* Other parameters (--device, --network host, -e DISPLAY) are the same as explained before, enabling camera access and display.
Highlighting the Results: A Portable and Easily Deployable AI Vision Solution #
Through this experiment, we successfully:
- Solved the challenge of Docker containers accessing external hardware (cameras).
- Packaged an AI application with complex dependencies (Python, OpenVINO™, OpenCV) into a standalone, executable Docker image.
- Enabled the graphical interface (camera feed) to be displayed from within the container onto the host screen.
What does this mean?
- For Developers/AEs: Quickly create standardized AI demo environments, reducing on-site setup time and increasing efficiency.
- For Sales Teams: Showcase AI capabilities to clients with more confidence, free from environmental constraints, demonstrating the ease of use of Advantech solutions.
- For Potential Customers: See that Advantech not only provides hardware but also solves practical software integration and deployment pain points, offering complete AIoT solutions. Our technology is proven and ready for implementation!
Compared to traditional deployment methods, the advantages of Dockerization are clear: environment consistency, rapid deployment, ease of management and updates. The results of this experiment, especially solving the hardware access problem, allow these advantages to be fully realized in edge AI scenarios requiring connections to sensors and cameras.
Conclusion and Outlook: Advantech’s Continuous Innovation Drives the Future of AIoT #
This experiment of packaging a Python AI application into Docker and successfully connecting an external camera is just one example of Advantech’s ongoing R&D and innovation in the AIoT field. It demonstrates our engineering team’s ability to solve complex technical problems and our commitment to providing customers with easier-to-use and more efficient solutions.
In the future, we will continue to explore:
- More complex hardware integration (e.g., multiple cameras, specialized sensors).
- Best practices for Dockerizing different AI models and frameworks.
- Deeper integration of Docker technology with Advantech’s edge computing platforms (like Edge AI Suite, DeviceOn) to provide a one-stop AI deployment and management experience.
We believe that through continuous technological exploration and breakthroughs, Advantech will continue to lead the AIoT industry’s development, helping customers overcome challenges and co-create a smart future!
Appendix: Save and Load Image
If you want to move this built Docker image to another computer that also has Docker installed, you can use the following commands:
- Export Image (Save): Save the image as a tar archive.
(Replace
docker save image_name -o image.tarimage_namewith your image name, e.g.,ty_runnable) - Import Image (Load): Load the image from the tar archive.
docker load -i image.tar
This allows your AI application to be easily portable, like a USB drive!